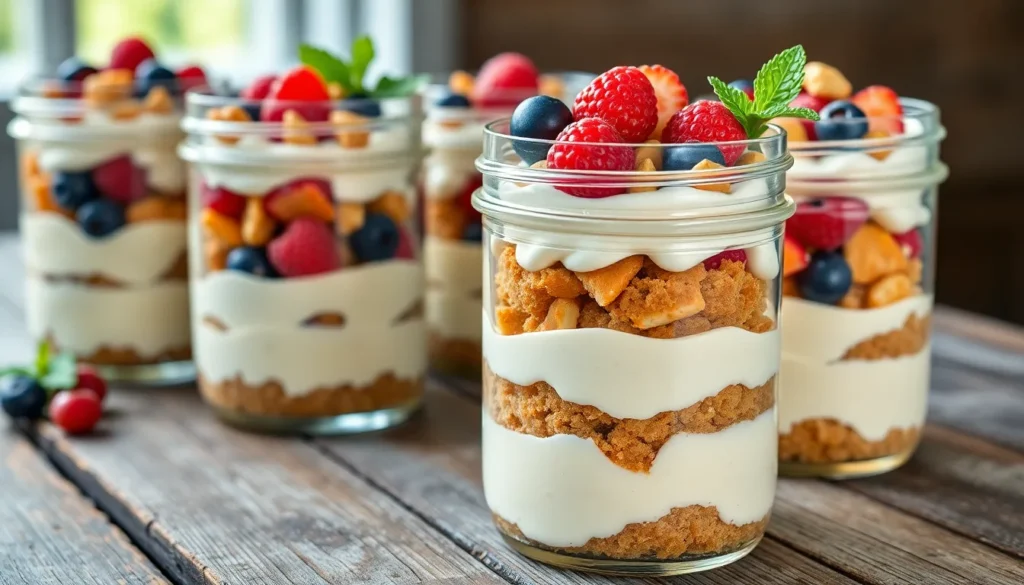
We’ve cracked the code on guilt-free dessert satisfaction with these high protein cheesecake jars that’ll make your taste buds sing without derailing your fitness goals. These portable parfaits pack an impressive protein punch while delivering all the creamy indulgence you’re craving from traditional cheesecake.
What makes these individual treats absolutely brilliant is their convenience factor. We can prep them ahead of time for grab-and-go snacks or elegant dinner party desserts that look restaurant-worthy but take minimal effort. Each jar contains muscle-building protein that supports your active lifestyle while satisfying those late-night sweet tooth emergencies.
The best part? We’re using simple wholesome ingredients that transform into something extraordinary. No artificial fillers or mysterious powders – just real food that happens to be incredibly good for you. These cheesecake jars prove you don’t have to choose between healthy eating and dessert happiness.
Ingredients
We’ve carefully selected each ingredient to maximize protein content while maintaining that creamy, indulgent cheesecake flavor you crave. Our recipe uses simple, wholesome ingredients that work together to create the perfect balance of nutrition and taste.
For the Crust
- 1 cup graham cracker crumbs
- 2 tablespoons vanilla protein powder
- 3 tablespoons melted coconut oil
- 2 tablespoons honey or maple syrup
- 1/4 teaspoon ground cinnamon
- Pinch of sea salt
For the Cheesecake Filling
- 16 oz plain Greek yogurt (full-fat)
- 8 oz cream cheese (softened)
- 1/2 cup vanilla protein powder
- 1/3 cup honey or stevia equivalent
- 2 large eggs
- 1 teaspoon vanilla extract
- 1 tablespoon fresh lemon juice
- 1/4 teaspoon sea salt
For the Toppings
- 1/2 cup fresh mixed berries
- 2 tablespoons chopped almonds or pecans
- 1 tablespoon chia seeds
- Fresh mint leaves for garnish
- Sugar-free whipped cream (optional)
Equipment Needed
 2")
Creating perfect high protein cheesecake jars requires the right tools to achieve that smooth, creamy texture we’re after. We’ve streamlined our equipment list to include only the essentials that will make your preparation process efficient and enjoyable.
Blender or Food Processor serves as our most critical piece of equipment for this recipe. We use this powerful appliance to blend the cottage cheese and Greek yogurt mixture until completely smooth, eliminating any lumps that could compromise the silky cheesecake texture. This same tool processes graham crackers into fine crumbs for our protein-packed crust layer.
Mason Jars or Clear Serving Glasses provide the perfect vessels for layering and presenting our cheesecake creations. We recommend using 8-ounce mason jars for individual portions, though any clear glass containers work beautifully to showcase the elegant layers.
Mixing Bowls and Silicone Spatula become essential when combining ingredients that don’t require blending. We use these tools for gently folding together our crust mixture and ensuring every ingredient incorporates evenly without overworking the delicate cheesecake filling.
Measuring Utensils help us maintain consistency across batches, though we often recommend using a kitchen scale for the most precise results. Accurate measurements ensure each jar delivers the same protein content and flavor profile we’ve perfected.
Kitchen Scale (Optional) elevates our precision when portioning ingredients, particularly important for achieving consistent protein content across all servings. We find this tool especially helpful when preparing multiple batches for meal prep or entertaining.
Each piece of equipment plays a exact role in creating the perfect texture and presentation that makes these high protein cheesecake jars so irresistible.
Instructions
 4")
Creating these high protein cheesecake jars involves a simple layering process that builds flavors and textures. We’ll guide you through each step to achieve perfectly balanced and visually stunning desserts.
Prepare the Crust
Crush the graham crackers in a food processor until they form fine crumbs. Transfer the crumbs to a mixing bowl and combine with protein powder, cinnamon, and sea salt. Melt the coconut oil and mix it with honey or maple syrup in a small bowl. Pour the liquid mixture over the dry ingredients and stir until the mixture holds together when pressed. The texture should resemble wet sand that clumps when squeezed.
Make the Cheesecake Filling
Blend the cream cheese and Greek yogurt in a food processor until completely smooth and creamy. Add the protein powder, honey or stevia, eggs, vanilla extract, lemon juice, and sea salt to the mixture. Process for 2-3 minutes until all ingredients are fully incorporated and the filling reaches a silky consistency. Scrape down the sides of the bowl as needed to ensure even mixing. Taste and adjust sweetness if desired.
Assemble the Jars
Spoon 2 tablespoons of the crust mixture into the bottom of each jar and press down firmly with the back of a spoon. Add a layer of the cheesecake filling, filling each jar about halfway. Scatter a handful of fresh berries over the filling layer. Add another layer of crust mixture if desired, then top with the remaining cheesecake filling. Leave about ½ inch of space at the top of each jar for final toppings.
Chill and Set
Cover each jar with a lid or plastic wrap and refrigerate for at least 4 hours to allow the cheesecakes to set properly. For best results, we recommend chilling overnight to achieve the ideal firm texture. Just before serving, add your chosen toppings such as additional berries, chopped nuts, chia seeds, or mint leaves. The assembled jars will keep in the refrigerator for up to 3 days.
Directions for Serving
 6")
We recommend serving our high protein cheesecake jars chilled for the ultimate creamy texture and refreshing taste. Remove the jars from the refrigerator approximately 10 minutes before serving to allow the filling to reach the perfect temperature that enhances flavor development.
Temperature Guidelines
Our no-bake versions taste best when served directly from the refrigerator at 35-40°F. Baked varieties require refrigeration for at least 4 hours after preparation to properly set before serving. We suggest chilling overnight for optimal texture and flavor integration.
| Serving Temperature | No-Bake Version | Baked Version |
|---|---|---|
| Optimal serving temp | 35-40°F | 35-40°F |
| Minimum chill time | 2 hours | 4 hours |
| Recommended chill time | Overnight | Overnight |
Presentation Tips
We garnish each jar with fresh berries just before serving to maintain their vibrant color and firm texture. Additional toppings like chopped nuts or chia seeds should be sprinkled on top right before presentation to preserve their crunch.
Storage for Serving
Our meal prep friendly no-bake versions maintain their quality in the refrigerator for up to 3 days when properly covered. We recommend keeping the jars sealed with their original lids or plastic wrap to prevent absorption of refrigerator odors and maintain freshness.
Serve these protein-packed treats as individual desserts for dinner parties or grab-and-go snacks for busy weekdays. Each jar provides a complete dessert experience with layers of flavor and texture that satisfy both nutritional goals and sweet cravings.
Make-Ahead Instructions
 8")
We love that these high protein cheesecake jars are perfect for meal prep and busy schedules. Our make ahead approach saves time while ensuring the flavors develop properly for the ultimate dessert experience.
No-Bake Version Storage
Our no-bake high protein cheesecake jars can be prepared up to 3 days in advance. We store them covered in the refrigerator where they maintain their creamy texture and fresh flavor. Freezing is not recommended for these delicate desserts as it compromises the smooth consistency we work so hard to achieve.
The cottage cheese and Greek yogurt blend continues to meld beautifully over time. We find that day-old jars often taste even better than freshly made ones because the maple syrup has more time to infuse throughout the mixture.
Baked Version Preparation
Our baked cheesecake jars require a different timeline for optimal results. After removing them from the water bath we refrigerate the jars for approximately 4 hours to achieve the perfect set texture. This chilling period allows the protein powder and cream cheese mixture to firm up properly.
We can prepare these baked versions up to 2 days ahead of serving. The extended refrigeration time actually improves the overall flavor profile as all ingredients have more opportunity to combine harmoniously.
Strategic Assembly Tips
| Component | Advance Prep Time | Storage Method |
|---|---|---|
| Crust mixture | Up to 5 days | Airtight container |
| Cheesecake filling | Up to 2 days | Covered bowl |
| Assembled jars | Up to 3 days | Individual covers |
We recommend preparing components separately when making large batches. The graham cracker crust can be mixed and stored for up to 5 days while maintaining its crunch. Our protein-rich filling stays fresh for 2 days when properly covered.
Assembly works best when done the day before serving. We layer the crust and filling then add fresh toppings just before presentation. This approach prevents berries from releasing excess moisture and keeps nuts from losing their satisfying crunch.
Optimal Make-Ahead Timeline
We suggest following this timeline for the best results. Three days before serving we can prepare and store the crust mixture. Two days ahead we blend our cheesecake filling and refrigerate it covered. One day before the event we assemble the complete jars without final toppings.
The morning of serving we add fresh berries and any additional garnishes. This systematic approach ensures every component tastes its absolute best while maximizing our prep efficiency.
Storage Tips
 10")
We recommend storing your high protein cheesecake jars in the refrigerator immediately after assembly to maintain their creamy texture and optimal flavor profile. These protein-packed desserts require consistent cold temperatures to set properly and preserve their delicate consistency.
Refrigeration Guidelines
Our cheesecake jars maintain peak freshness when consumed within 3 to 4 days of preparation. We’ve found this timeframe ensures the best balance of flavor and texture quality. Some variations using airtight mason jars can extend storage up to 5 days in the refrigerator when properly sealed.
| Storage Method | Duration | Container Type |
|---|---|---|
| Standard refrigeration | 3-4 days | Any covered jar |
| Extended refrigeration | Up to 5 days | Airtight mason jars |
| Room temperature serving | 30 minutes max | Original container |
Optimal Serving Temperature
We suggest removing the jars from refrigeration approximately 30 minutes before serving to achieve the ideal texture and flavor release. This brief room temperature rest allows the cheesecake to soften slightly while maintaining its structural integrity.
Container Requirements
Airtight containers or mason jars with secure lids provide the best protection against moisture loss and flavor contamination. We always ensure our storage containers create a complete seal to prevent the cheesecake from absorbing refrigerator odors or developing a dry surface.
Freezing Considerations
Freezing these high protein cheesecake jars is not recommended for most recipes due to potential texture changes upon thawing. But, some variations may tolerate long-term freezer storage when using completely airtight containers and proper wrapping techniques.
Environmental Protection
We keep our stored cheesecake jars away from direct sunlight and heat sources within the refrigerator. Positioning them on stable middle shelves prevents temperature fluctuations that could compromise the dessert’s smooth consistency and fresh taste.
Protein Content Breakdown
 12")
We’ve analyzed protein levels across various high protein cheesecake jar recipes to help you understand exactly how much muscle-building nutrition you’re getting in each serving. Our research reveals important differences between preparation methods and ingredient combinations that directly impact the final protein content.
Different recipe variations deliver varying amounts of protein per serving. Carmy’s High Protein Cheesecake Jars pack approximately 30 grams of protein per serving by maximizing cottage cheese and Greek yogurt content. Low Carb Spark’s version matches this impressive protein level at around 30 grams per serving through strategic use of cottage cheese and protein powder combinations.
Cooking Point’s High Protein Cheesecake Jars provide about 16 grams of protein per jar using a blend of cream cheese, Greek yogurt, cottage cheese, and protein powder. This variation offers a more moderate protein boost while maintaining the classic cheesecake flavor profile.
| Recipe Source | Protein Content | Calories | Carbohydrates |
|---|---|---|---|
| Carmy | 30 grams | N/A | N/A |
| Low Carb Spark | 30 grams | N/A | N/A |
| Cooking Point | 16 grams | 350 kcal | 23 grams |
We recommend targeting recipes with higher cottage cheese content if maximizing protein is your primary goal. Greek yogurt serves as an excellent secondary protein source while contributing to the creamy texture we all love in traditional cheesecake. Protein powder additions can boost numbers significantly without compromising taste when properly balanced with other ingredients.
Our analysis shows that cottage cheese consistently delivers the highest protein density among cheesecake jar ingredients. Recipes incorporating both cottage cheese and protein powder achieve the most impressive protein levels while maintaining dessert appeal. The key lies in finding the right balance between protein content and flavor satisfaction for your exact fitness goals.
Flavor Variations
 14")
We can customize our high protein cheesecake jars with different flavors to create exciting taste combinations that never get boring. Each variation maintains the same impressive protein content while delivering unique flavors that satisfy different cravings.
Chocolate High Protein Cheesecake Jars
Rich cocoa powder transforms our basic cheesecake filling into a decadent chocolate dessert that delivers both indulgence and nutrition. We blend cottage cheese, cream cheese, and protein powder with unsweetened cocoa powder to create a smooth and creamy chocolate base. The cocoa adds deep chocolate flavor without compromising the protein density we’re targeting.
For the perfect chocolate version, we recommend using 2-3 tablespoons of unsweetened cocoa powder per batch. This creates a rich chocolatey taste while maintaining the smooth texture that makes these jars so irresistible. We can enhance the chocolate experience by adding a pinch of espresso powder or using chocolate protein powder instead of vanilla.
Berry High Protein Cheesecake Jars
Fresh berries provide a sweet and fruity contrast that perfectly complements our creamy cheesecake filling. We layer strawberries, blueberries, or raspberries on top of the cheesecake mixture to create beautiful color combinations and burst of natural sweetness. The berries add vitamin C and antioxidants while keeping the sugar content naturally low.
We suggest using a mix of berries for the most visually appealing presentation and varied flavor profile. Fresh berries work best as they maintain their texture and don’t release excess moisture into the cheesecake layer. For added convenience, we can prepare berry compote by gently heating berries with a touch of honey and letting them cool before layering.
Peanut Butter High Protein Cheesecake Jars
Natural peanut butter creates a nutty and satisfying flavor that pairs beautifully with our protein-rich base. We incorporate 2-3 tablespoons of smooth peanut butter directly into the cottage cheese and cream cheese mixture during blending. This creates a uniform peanut butter flavor throughout the entire cheesecake layer.
The healthy fats from peanut butter complement the high protein content while adding richness and depth to each bite. We recommend using natural peanut butter without added sugars to maintain the nutritional integrity of our jars. For extra texture, we can sprinkle chopped peanuts on top just before serving to add a satisfying crunch that contrasts with the smooth cheesecake filling.
Tips for Success
 16")
Achieving perfect high protein cheesecake jars requires attention to exact techniques that we’ve refined through countless batches. Our experience shows that temperature control makes the most important difference in texture and consistency.
Temperature Management proves crucial for optimal results. We recommend bringing all dairy ingredients to room temperature before mixing to prevent lumps and ensure smooth blending. Cold cream cheese creates chunky textures that resist smooth incorporation even with extensive mixing.
Ingredient Quality directly impacts both protein content and flavor profiles. Select full-fat Greek yogurt with at least 15 grams of protein per serving to maximize nutritional benefits. We prefer cottage cheese with minimal additives since these products deliver the highest protein density without compromising taste.
Mixing Techniques determine final texture quality. Blend ingredients in exact order by starting with cream cheese until completely smooth before adding other dairy components. This method prevents grainy textures that often plague homemade protein desserts.
Layering Strategy affects both presentation and structural integrity. Pack crust layers firmly using the back of a spoon to create stable foundations that support filling weight. We suggest filling each jar only three-quarters full to allow space for expansion during chilling.
Chilling Time cannot be rushed for optimal results. No-bake versions require minimum four hours at 35-40°F to achieve proper consistency while baked varieties need overnight refrigeration. Insufficient chilling time results in runny textures that fail to hold their shape.
| Success Factor | No-Bake Version | Baked Version |
|---|---|---|
| Minimum Chill Time | 4 hours | 8 hours |
| Optimal Temperature | 35-40°F | 35-40°F |
| Protein Content Range | 16-30g per jar | 20-25g per jar |
| Storage Duration | 3 days | 4 days |
Equipment Preparation streamlines the assembly process significantly. Clean mason jars thoroughly and dry completely to prevent condensation that dilutes flavors. We recommend chilling empty jars for 30 minutes before assembly to maintain consistent temperatures throughout the process.
Portion Control ensures consistent protein distribution across batches. Use a kitchen scale to measure filling portions precisely since eyeballing quantities leads to uneven protein content between jars. Each standard 8-ounce jar should contain approximately 6 ounces of filling for optimal serving size.
Protein Powder Selection impacts both texture and nutritional value. Choose unflavored or vanilla protein powders that blend seamlessly without creating gritty textures. We avoid chocolate protein powders in base recipes since they can overpower delicate cheesecake flavors and create muddy colors.
Conclusion
We’ve shown you how high protein cheesecake jars can transform your dessert game while supporting your fitness goals. These versatile treats offer endless customization options and impressive protein content that ranges from 16 to 30 grams per serving.
The beauty of these jars lies in their convenience and meal prep potential. You can prepare multiple variations ahead of time and have nutritious desserts ready whenever cravings strike.
Whether you choose chocolate berry or peanut butter variations the key is balancing quality ingredients with proper preparation techniques. Remember to focus on temperature management and ingredient selection for consistently delicious results.
Start experimenting with our recipes and discover how satisfying healthy desserts can be. Your taste buds and muscles will thank you for making this smart swap.
Frequently Asked Questions
What are high protein cheesecake jars?
High protein cheesecake jars are guilt-free, portable desserts that combine the indulgent taste of traditional cheesecake with muscle-building protein. Made with ingredients like Greek yogurt, cottage cheese, and protein powder, these convenient parfaits satisfy sweet cravings while supporting fitness goals. They’re perfect for meal prep and can be enjoyed as healthy snacks or elegant dessert presentations.
How much protein do these cheesecake jars contain?
Protein content varies significantly based on the recipe and ingredients used. High-protein versions can contain approximately 30 grams of protein per serving when maximizing cottage cheese and Greek yogurt content, while other variations may offer around 16 grams per jar. The key is choosing recipes with higher cottage cheese content for maximum protein density.
What ingredients do I need to make high protein cheesecake jars?
Essential ingredients include plain Greek yogurt, cream cheese, protein powder, and sweetener (honey or stevia) for the filling. The crust requires graham cracker crumbs, protein powder, coconut oil, and cinnamon. Toppings can include fresh berries, chopped nuts, chia seeds, and optional sugar-free whipped cream for added nutrition and flavor.
What equipment is needed to make these jars?
You’ll need a blender or food processor for smooth texture, mason jars or clear serving glasses for layering, mixing bowls, and a silicone spatula. Measuring tools, particularly a kitchen scale, help maintain consistency in protein content and flavor. Each piece of equipment ensures the jars are both visually appealing and delicious.
How long should I chill the cheesecake jars?
Chill the assembled jars for at least 4 hours, preferably overnight, to achieve the ideal creamy texture. No-bake versions taste best at 35-40°F and require a minimum of 2 hours chilling, while baked varieties need at least 4 hours of refrigeration. Remove from the refrigerator about 10 minutes before serving for optimal temperature.
How long can I store high protein cheesecake jars?
These jars can be stored in the refrigerator for up to 3-4 days when properly covered in airtight containers. Some variations in mason jars may last up to 5 days. Avoid freezing as it can change the texture. Keep them away from direct sunlight and heat sources to preserve quality and flavor.
Can I make these jars ahead of time?
Yes, these cheesecake jars are perfect for meal prep and make-ahead preparation. They can be stored in the refrigerator for up to 3 days while maintaining their creamy texture. For best results, prepare components separately and assemble when ready to serve, adding fresh toppings just before serving to maintain their texture.
What flavor variations are available?
Popular variations include Chocolate High Protein Cheesecake Jars with added cocoa powder, Berry versions featuring fresh mixed berries, and Peanut Butter jars with natural peanut butter. Each variation maintains impressive protein content while offering unique flavors to satisfy different taste preferences and dietary goals.
What are the key tips for success when making these jars?
Bring dairy ingredients to room temperature for better mixing, select high-protein Greek yogurt and cottage cheese, and follow proper layering techniques. Use quality ingredients, maintain proper chilling times, and prepare equipment in advance. Practice portion control and ensure consistent protein distribution across batches for best results.