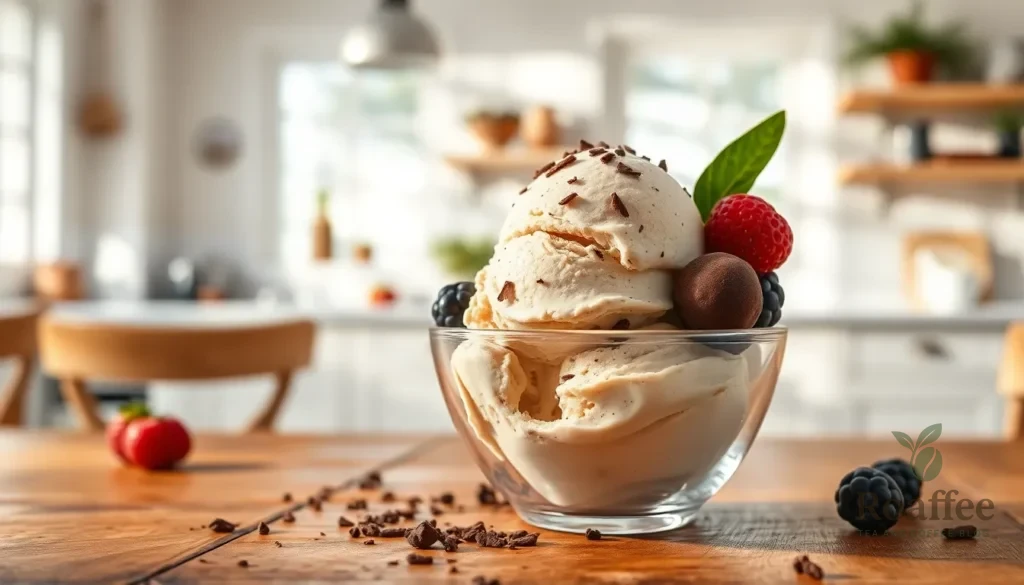
Nothing beats the rich, creamy satisfaction of homemade coffee ice cream on a hot summer day. We’ve perfected this no-egg coffee ice cream recipe that delivers all the indulgent flavor you crave without the hassle of tempering eggs or worrying about food safety. This simple yet luxurious treat combines the bold essence of coffee with silky smooth texture that’ll rival any premium ice cream shop.
Our eggless version uses a clever combination of heavy cream and milk to create that coveted creamy consistency. The secret lies in the perfect balance of ingredients and a foolproof technique that guarantees success every time. Whether you’re avoiding eggs for dietary reasons or simply want a straightforward recipe that works, this coffee ice cream delivers exceptional results.
Ingredients
Creating our no-egg coffee ice cream requires simple yet high-quality ingredients that deliver maximum flavor and texture. We’ve organized these ingredients into categories to help you gather everything needed for this delicious frozen treat.
For the Ice Cream Base
- 2 cups heavy cream
- 1 cup whole milk
- 3/4 cup granulated sugar
- 1/4 teaspoon salt
- 1 teaspoon vanilla extract
For the Coffee Flavor
- 3 tablespoons instant coffee granules
- 2 tablespoons hot water
- 1/4 cup strong brewed coffee (cooled)
- 1 tablespoon coffee liqueur (optional)
Optional Add-ins
- 1/2 cup mini chocolate chips
- 1/3 cup crushed chocolate-covered espresso beans
- 1/4 cup chopped toasted almonds
- 2 tablespoons cocoa powder for mocha variation
- 1 teaspoon cinnamon for spiced coffee flavor
Equipment Needed

Creating our delicious no-egg coffee ice cream requires minimal equipment, making this recipe accessible to home cooks with basic kitchen tools. We’ve organized the essential items you’ll need based on whether you choose the traditional churned method or the convenient no-churn approach.
Essential Equipment for Both Methods:
- Large mixing bowls for combining ingredients
- Hand blender or stand mixer with whisk attachment for proper mixing
- Rubber spatula for folding ingredients gently
- Measuring cups and spoons for accurate ingredient portions
For Traditional Churned Method:
- Ice cream maker (any standard home model works perfectly)
- Freezer-safe container for final storage
For No-Churn Method:
- Freezer-safe container with tight-fitting lid
- Electric mixer or whisk for whipping cream to proper consistency
The beauty of this recipe lies in its flexibility with equipment choices. We recommend using a stand mixer with whisk attachment when making the no-churn version, as it creates the ideal fluffy texture needed for smooth ice cream without a machine. Hand blenders work exceptionally well for dissolving the instant coffee powder completely into the milk mixture.
| Equipment Type | Traditional Method | No-Churn Method |
|---|---|---|
| Ice cream maker | Required | Not needed |
| Electric mixer | Helpful | Essential |
| Mixing bowls | 2-3 bowls | 1-2 bowls |
| Freezing time | 5-6 hours | 8+ hours |
Most home kitchens already contain these basic tools, making our coffee ice cream recipe an achievable treat without special equipment purchases. The no-churn method particularly appeals to those without ice cream makers, requiring only standard kitchen appliances to achieve professional-quality results.


Instructions

Creating this no-egg coffee ice cream requires careful attention to temperature and timing to achieve the perfect creamy texture. We’ll guide you through each step to ensure your homemade treat rivals any store-bought version.
Prep the Coffee Base
We begin by dissolving the instant coffee granules in hot water to create a concentrated coffee mixture. Combine the dissolved coffee with cooled strong brewed coffee and coffee liqueur if using. Set this coffee concentrate aside to cool completely while we prepare the cream base.
In a large mixing bowl, whisk together the whole milk, granulated sugar, and salt until the sugar completely dissolves. The mixture should appear smooth without any granular texture. Add the cooled coffee concentrate and vanilla extract to the milk mixture, whisking thoroughly to combine all flavors evenly.
Heat the Cream Mixture
Pour the coffee and milk mixture into a medium saucepan and heat over medium-low heat, stirring constantly to prevent scorching. We want to warm the mixture just enough to ensure complete sugar dissolution without bringing it to a boil. Heat until the mixture reaches approximately 160°F or until you can see steam rising from the surface.
Remove the saucepan from heat and allow the mixture to cool to room temperature. This heating step enhances the coffee flavor integration and creates a smoother final texture in our ice cream.
Combine and Chill
Add the heavy cream to the cooled coffee mixture, gently folding it in with a rubber spatula to maintain the cream’s light texture. Avoid aggressive mixing which can deflate the cream and affect the final ice cream consistency. Transfer the combined mixture to a covered container and refrigerate for at least 2 hours.
This chilling period allows the flavors to meld completely while ensuring the mixture reaches the optimal temperature for churning. The mixture should feel cold to the touch before proceeding to the churning stage.
Churn the Ice Cream
Pour the chilled mixture into your ice cream maker and churn according to the manufacturer’s instructions, typically 25 minutes or until the mixture reaches a soft-serve consistency. The ice cream should coat the back of a spoon and hold its shape when lifted with the churning paddle.
For those using the no-churn method, whip the heavy cream until it forms stiff peaks, then gently fold in the sweetened coffee milk mixture until just combined. This technique creates air incorporation similar to traditional churning.
Freeze Until Set
Transfer the churned ice cream to a freezer-safe container, pressing a piece of plastic wrap directly onto the surface to prevent ice crystals from forming. Freeze for 5 to 6 hours or until the ice cream reaches a scoopable consistency that holds its shape.
Before serving, allow the ice cream to soften at room temperature for 5 minutes for easier scooping. Store any remaining ice cream in the freezer for up to two weeks, though it tastes best within the first week of preparation.


Directions for No-Churn Method

We’ll create our creamy coffee ice cream using a simple no-churn technique that requires no special equipment. This method produces silky smooth results without the need for an ice cream maker.
Mix the Base
We start by dissolving our instant coffee granules in hot water to create a concentrated coffee base. In a large mixing bowl, we combine ¾ cup of whole milk with ¾ cup of organic cane sugar and a pinch of salt. Using a hand blender or whisk, we mix these ingredients until the sugar completely dissolves and the mixture becomes smooth.
We add our prepared coffee concentrate to the milk mixture, stirring gently to incorporate all flavors. The key is ensuring every granule of coffee dissolves completely to avoid any gritty texture in our final product.
Whip and Fold
We pour 1½ to 2 cups of heavy cream into our coffee base mixture. Using a hand mixer or stand mixer with a whisk attachment, we whip the entire mixture on high speed for 3 to 4 minutes until it thickens and becomes creamy.
The mixture should hold soft peaks and have a mousse-like consistency when properly whipped. We avoid over-mixing to prevent the cream from becoming too thick or separating. If desired, we gently fold in optional chocolate shavings at this stage for added texture and flavor.
Freeze and Set
We transfer our whipped coffee mixture into a freezer-safe container, smoothing the top with a rubber spatula. The container should be covered tightly to prevent ice crystals from forming on the surface.
We freeze the ice cream for at least 5 to 8 hours or overnight until it reaches a firm, scoopable consistency. The whipping process incorporates enough air to create a smooth, creamy texture without the need for churning during the freezing process.


Make-Ahead Instructions

We can prepare this no-egg coffee ice cream up to two weeks in advance, making it perfect for entertaining or meal prep. The key to successful make-ahead preparation lies in proper timing and storage techniques.
Preparing the Base in Advance
We recommend mixing and chilling the coffee ice cream base up to 24 hours before churning. This extended chilling time actually improves the final texture and allows the coffee flavors to fully develop. Store the prepared base in the refrigerator in an airtight container until ready to churn.
Churned Ice Cream Timeline
After churning our coffee ice cream for approximately 25 minutes, we transfer it to a freezer-safe container for the final freeze. The ice cream needs 5 to 6 hours of additional freezing time to reach the perfect scoopable consistency. We can complete this process entirely the day before serving.
No-Churn Method Scheduling
The no-churn version requires overnight freezing or at least 8 hours in the freezer. We suggest preparing this method in the morning if serving the same evening, or the night before for next-day enjoyment. The whipped cream mixture maintains its texture beautifully during the extended freeze time.
Storage Guidelines
| Storage Method | Time Frame | Best Practices |
|---|---|---|
| Refrigerator (base only) | Up to 24 hours | Airtight container, stir before use |
| Freezer (finished ice cream) | Up to 2 weeks | Freezer-safe container with tight lid |
| Optimal serving window | 3-7 days | Cover surface with plastic wrap |
Day-of-Serving Tips
We remove the ice cream from the freezer 5 to 10 minutes before serving to achieve the ideal scooping texture. This brief softening period prevents the ice cream from becoming too hard while maintaining its creamy consistency. The coffee flavor actually intensifies slightly after the first day of freezing, creating an even richer taste experience.


Storage Tips

Proper storage ensures our coffee ice cream maintains its creamy texture and rich flavor for weeks. We recommend transferring the finished ice cream to an airtight freezer-safe container immediately after churning or setting.
Container Selection and Placement
We store our coffee ice cream in containers that seal tightly to prevent ice crystals and freezer burn. The coldest part of our freezer works best for consistent texture. We avoid storing ice cream in the freezer door where temperature fluctuations occur frequently.
Optimal Storage Duration
Our coffee ice cream stays fresh for up to 2 weeks when stored properly. The texture and flavor remain at their peak during the first week of storage.
| Storage Timeline | Quality Level | Notes |
|---|---|---|
| 1-7 days | Optimal | Best texture and flavor |
| 8-14 days | Good | Slight texture changes may occur |
| 15+ days | Declining | Quality begins to deteriorate |
Pre-Serving Preparation
We let our coffee ice cream soften at room temperature for 5 to 10 minutes before scooping. This brief thawing period makes scooping easier and improves the creamy mouthfeel. The coffee flavor actually intensifies after the first day of freezing.
Preventing Ice Crystal Formation
We press a piece of plastic wrap directly onto the surface of our ice cream before sealing the container. This extra barrier prevents air exposure that leads to ice crystal formation. We also ensure our freezer maintains a consistent temperature of 0°F or below for optimal results.
Serving Suggestions

Our egg-free coffee ice cream transforms into an elegant dessert with the right accompaniments and presentation. We recommend serving this creamy treat in chilled bowls or glasses to maintain its perfect texture while improving the overall experience.
Simple Toppings and Garnishes
We love pairing our coffee ice cream with chocolate shavings or chopped nuts for added texture and flavor contrast. Mini chocolate chips or crushed chocolate-covered espresso beans create delightful bursts of complementary flavors with each bite. For those seeking a luxurious touch, we suggest drizzling warm chocolate sauce or caramel over generous scoops.
Fruit Accompaniments
Fresh berries provide a bright acidic contrast that balances the rich coffee flavor beautifully. We particularly enjoy serving our ice cream alongside berry compote or fresh strawberry pie, as the tartness cuts through the creamy richness. Mixed berry medleys or a simple raspberry coulis elevate the dessert to restaurant-quality presentation.
Beverage Pairings
Strong espresso or freshly brewed coffee creates an intensified coffee experience when served alongside our ice cream. We recommend offering biscotti or shortbread cookies for dipping and textural variety. For special occasions, we suggest pairing scoops with a shot of coffee liqueur or creating affogato by pouring hot espresso directly over the ice cream.
Creative Serving Ideas
Transform our coffee ice cream into impressive sundaes by layering it with whipped cream and various sauces. We enjoy creating ice cream sandwiches using chocolate wafer cookies or serving it between slices of pound cake. For elegant dinner parties, we present individual portions in glass bowls garnished with a single espresso bean and a delicate wafer cookie.
Temperature and Timing
Remember to allow our coffee ice cream to soften for 5 to 10 minutes before serving to achieve the ideal scooping consistency. We find that the coffee flavor intensifies beautifully after the first day of freezing, making day-old ice cream particularly flavorful for special presentations.
Variations

Our coffee ice cream recipe serves as a versatile base for creating exciting flavor combinations that cater to different taste preferences. These variations maintain the same egg-free approach while adding unique elements to enhance your frozen dessert experience.
Mocha Coffee Ice Cream
We transform our basic coffee ice cream into a rich chocolate-coffee delight by incorporating cocoa powder into the mixture. Combine 1 cup whole cold milk with 2 cups heavy whipping cream and ¾ cup sugar in a large bowl. Add 2 tablespoons espresso powder alongside 2 tablespoons Dutch-processed cocoa powder for the smoothest chocolate flavor. Blend the ingredients using a hand blender until the sugar completely dissolves and no cocoa lumps remain.
The Dutch-processed cocoa powder creates a deeper chocolate flavor that complements the coffee without overwhelming it. Chill the mixture for 2 hours before churning in your ice cream maker according to the manufacturer’s instructions. This mocha variation offers a sophisticated balance between bitter coffee notes and smooth chocolate richness.
Iced Coffee Float Style
We create an adult twist on the classic root beer float by serving our coffee ice cream in a glass of chilled strong brewed coffee. Prepare a generous scoop of our no-egg coffee ice cream and place it in a tall glass. Pour cold brew coffee or chilled espresso slowly around the ice cream to create layers of flavor.
Add a splash of cream or milk if you prefer a milder coffee taste. The ice cream gradually melts into the cold coffee creating a creamy iced coffee beverage with intense flavor. This serving style works particularly well for entertaining guests or enjoying as an afternoon treat when you want both dessert and a caffeine boost.
Coffee Chip Ice Cream
We elevate our basic recipe by adding textural elements during the final minutes of churning. Prepare the coffee ice cream base following our standard no-egg method. During the last 5 minutes of churning add ½ cup mini chocolate chips or dark chocolate chunks to the mixture. The timing ensures the chips distribute evenly without sinking to the bottom.
For additional texture contrast consider including toffee bits or mocha crunch elements alongside the chocolate chips. These additions create pleasant surprises in each bite while maintaining the smooth coffee base. The chocolate chips provide bursts of sweetness that complement the coffee’s slight bitterness perfectly.


Troubleshooting Tips

Making coffee ice cream without eggs can present unique challenges, but we’ve identified common issues and their answers to ensure your dessert turns out perfectly every time.
Sugar and Coffee Not Dissolving
When granulated sugar refuses to dissolve completely, we recommend using warm milk instead of cold milk during the initial mixing process. The gentle heat helps break down sugar crystals more efficiently. For instant coffee granules that won’t dissolve, create a concentrated coffee paste by mixing the granules with 2 tablespoons of hot water first, then incorporate this mixture into your cream base.
Texture Too Icy or Grainy
Icy texture typically results from insufficient air incorporation during the mixing process. We ensure proper whipping by beating the cream mixture until it reaches stiff peaks in the no-churn method. For churned versions, verify that your ice cream maker churns for the full 20-30 minutes recommended time. Under-churned ice cream lacks the air bubbles necessary for smooth texture.
Coffee Flavor Too Bitter
Overly bitter coffee ice cream often stems from using too much instant coffee or espresso powder. We suggest reducing the coffee amount by half and gradually increasing until you achieve the desired flavor intensity. Adding an extra 2-3 tablespoons of sugar can balance excessive bitterness without masking the coffee taste.
Ice Cream Freezing Too Hard
Rock-hard ice cream that’s difficult to scoop indicates either over-freezing or insufficient fat content. We recommend removing the ice cream from the freezer 5-10 minutes before serving to allow proper softening. For future batches, ensure you’re using heavy cream with at least 35% fat content rather than lighter alternatives.
| Common Issue | Solution | Prevention Time |
|---|---|---|
| Sugar won’t dissolve | Use warm milk | 2-3 minutes |
| Icy texture | Whip cream to stiff peaks | 5-8 minutes |
| Too bitter | Reduce coffee by 50% | N/A |
| Too hard to scoop | Let sit 5-10 minutes | Before serving |
Mixture Won’t Thicken
If your coffee ice cream base remains too thin after chilling, the heavy cream may not have been whipped sufficiently. We salvage thin mixtures by returning them to the mixer and whipping until the consistency resembles thick yogurt. This additional air incorporation creates the body needed for proper freezing.
Flavor Intensity Issues
Coffee flavor that seems too weak after freezing requires adjustment in your next batch. We dissolve an additional tablespoon of instant coffee in hot water and fold it into the mixture before final freezing. Remember that frozen desserts taste less intense than their unfrozen counterparts, so slightly over-flavoring the base compensates for this dulling effect.


Conclusion
This egg-free coffee ice cream recipe delivers all the creamy indulgence we crave without the complexity of traditional custard-based methods. We’ve shown you how simple ingredients and straightforward techniques can create a dessert that rivals any premium ice cream shop offering.
Whether you choose the churned or no-churn method both approaches guarantee rich coffee flavor and smooth texture. The versatility of this recipe means you can customize it with your favorite add-ins or serve it exactly as written – either way you’ll have a crowd-pleasing dessert.
With proper storage techniques and our troubleshooting tips you’re equipped to make perfect coffee ice cream every time. The best part? You can enjoy this homemade treat knowing it’s both delicious and safe to make without worrying about raw eggs.
Frequently Asked Questions
Can I make coffee ice cream without eggs?
Yes! This no-egg coffee ice cream recipe creates a rich, creamy dessert using heavy cream and milk as the base. The absence of eggs eliminates the need for tempering while still delivering a luxurious texture and bold coffee flavor.
What equipment do I need to make this ice cream?
You’ll need basic kitchen tools: mixing bowls, measuring cups, a hand blender or stand mixer, and rubber spatula. For churned ice cream, use an ice cream maker. The no-churn method only requires a freezer-safe container and electric mixer.
How long does homemade coffee ice cream last?
The ice cream stays fresh for up to 2 weeks when stored in an airtight container in the coldest part of your freezer. For best texture and flavor, consume within the first week. The coffee flavor actually intensifies after the first day.
What’s the difference between churned and no-churn methods?
Churned ice cream uses an ice cream maker and requires 5-6 hours additional freezing time. The no-churn method whips cream into the coffee mixture until mousse-like, then freezes overnight. Both methods produce creamy, delicious results.
Can I make variations of this coffee ice cream?
Absolutely! Try adding cocoa powder for mocha flavor, mini chocolate chips for texture, or coffee liqueur for extra richness. You can also create an iced coffee float by serving with chilled brewed coffee.
How do I prevent my ice cream from becoming too hard or icy?
Ensure proper whipping to incorporate air, use the correct cream-to-milk ratio, and store in airtight containers. Let the ice cream soften for 5-10 minutes before scooping, and press plastic wrap directly onto the surface to prevent ice crystals.
Can I prepare the ice cream base in advance?
Yes! Prepare and chill the coffee ice cream base up to 24 hours ahead for enhanced flavor and texture. This advance preparation actually improves the final product’s taste and consistency.