We’ve all scrolled through those perfectly curated coffee photos on social media and wondered how to recreate that Instagram-worthy magic at home. Aesthetic coffee isn’t just about taste—it’s about creating a visual masterpiece that makes your morning routine feel like a luxurious café experience.
The beauty of aesthetic coffee lies in its simplicity and attention to detail. From perfectly steamed milk foam art to carefully arranged toppings we’ll show you how to transform your regular cup of joe into a photogenic work of art. Whether you’re looking to impress guests or simply elevate your daily coffee ritual these techniques will help you master the art of beautiful coffee presentation.
With just a few basic tools and some creative flair you’ll be crafting café-quality aesthetic coffee that not only tastes amazing but looks absolutely stunning. Let’s jump into the secrets behind creating those picture-perfect coffee moments that’ll have your friends asking for your barista secrets.
What Makes Coffee Aesthetic
Visual appeal transforms ordinary coffee into an Instagram-worthy masterpiece. We believe aesthetic coffee combines color contrast, texture variation, and artistic presentation to create a feast for the eyes before the first sip touches your lips.
Color plays the starring role in aesthetic coffee creation. Rich espresso browns create stunning contrast against pristine white foam, while golden caramel swirls add warmth and depth. We often incorporate colorful elements like vibrant latte art, pastel-tinted milk alternatives, or natural garnishes that pop against the coffee’s earthy tones.
Texture creates visual interest through layered elements that tell a story. Velvety microfoam sits atop smooth espresso, while whipped cream adds fluffy dimension. We love incorporating crunchy elements like cocoa powder dusting, cinnamon sprinkles, or even edible flowers that provide textural contrast.
Composition elevates the entire presentation beyond the cup itself. We consider the background, lighting, and surrounding elements that frame our coffee creation. Clean surfaces, natural lighting, and thoughtfully placed props like vintage spoons or artistic napkins enhance the overall aesthetic appeal.
Precision in preparation ensures consistent visual results. We focus on proper milk steaming techniques that create glossy, paintable foam for latte art. Temperature control maintains optimal texture, while timing prevents separation that ruins the visual harmony.
Creative garnishes transform simple coffee into artisanal presentations. We experiment with cocoa stencils, flavored syrups that create marble effects, and seasonal toppings that reflect current trends. Fresh herbs, spice dustings, and even geometric foam patterns add personality to each cup.
Glassware and serving vessels significantly impact aesthetic appeal. We choose cups that complement the coffee’s color palette while considering size proportions that showcase layered drinks. Clear glasses reveal beautiful stratification in layered beverages, while ceramic mugs provide classic elegance for traditional presentations.
Essential Equipment for Aesthetic Coffee

Creating visually stunning coffee requires the right combination of brewing precision and styling finesse. We’ll explore the essential tools that transform ordinary coffee preparation into an artistic experience.
Coffee Brewing Equipment
Quality Coffee Beans
Fresh, high-quality beans form the foundation of exceptional aesthetic coffee. We recommend selecting beans with rich color profiles that photograph beautifully and deliver outstanding flavor.
Precision Grinder
A quality grinder controls grind size with accuracy, matching your chosen brewing method. Fine grinds work best for espresso while coarse grinds suit French press brewing perfectly.
Digital Scale
Exact measurements ensure consistent flavor and strength in every cup. We use digital scales to measure both coffee and water precisely, eliminating guesswork from the brewing process.
Gooseneck Kettle
Precise pouring control becomes essential for pour-over methods and aesthetic presentation. The narrow spout allows us to create controlled water flow patterns that enhance both extraction and visual appeal.
Brewing Devices
Multiple brewing options expand our creative possibilities:
- Espresso Machine: Complete with portafilter and tamper for perfect extraction and rich crema formation
- French Press: Full immersion brewing with elegant plunger separation creates distinct layers
- Pour-Over Brewers: V60, Chemex, and Kalita Wave offer clean cups with visual brewing control
- Siphon and AeroPress: Unique brewing styles provide visually impressive preparation methods
Water Filtration System
Filtered water improves both taste clarity and visual presentation. Clean water eliminates impurities that can cloud the coffee’s appearance and affect flavor profiles.
Thermometer
Maintaining ideal brewing temperatures enhances flavor clarity and extraction consistency. We monitor water temperature to ensure optimal brewing conditions every time.
Photography and Styling Tools
Clean Glassware and Cups
Attractive vessels showcase coffee color and crema effectively. We select cups and glasses that complement the coffee’s visual characteristics while maintaining professional presentation standards.
Lighting Equipment
Natural lighting or soft artificial sources capture coffee’s warmth and texture beautifully. We position our setup near windows or use diffused lighting to highlight the coffee’s rich colors and steam.
Background Props
Wooden trays, cloth napkins, and scattered coffee beans add context and visual interest. These styling elements create depth and tell a story around our coffee presentation.
Latte Art Tools
Milk pitchers and frothers enable decorative patterns that enhance visual appeal significantly. We use these tools to create heart shapes, leaves, and intricate designs that photograph exceptionally well.
Camera Equipment
High-resolution cameras or smartphones capture detailed close-up shots effectively. We focus on equipment that reproduces the coffee’s rich textures and subtle color variations accurately.
Ingredients

Creating stunning aesthetic coffee starts with selecting the right components that balance flavor and visual appeal. We’ll guide you through each ingredient category to help you build the perfect foundation for your photogenic coffee creation.
Coffee Selection
Quality coffee beans form the backbone of any aesthetic coffee creation. We recommend using fresh, high-quality beans that match your preferred brewing method for optimal flavor extraction.
Bean Roast Levels:
- Light roast: Bright, acidic flavors with floral notes
- Medium roast: Balanced sweetness and acidity
- Dark roast: Rich, bold flavors with chocolate undertones
Brewing Method Considerations:
- Pour-over (Chemex, V60): Medium-coarse grind for clean, crisp cups with visual clarity
- French Press: Coarse grind for full-bodied, rich coffee with thick texture
- AeroPress: Medium grind for smooth, low-bitterness coffee with consistent extraction
Milk and Alternatives
The right milk choice creates the creamy foundation essential for latte art and visual contrast. We suggest considering both flavor profile and steaming properties when making your selection.
Dairy Options:
- Whole milk: Creates rich foam and traditional latte art
- 2% milk: Lighter texture with good steaming properties
Plant-Based Alternatives:
- Oat milk: Creamy texture that steams well for latte art
- Coconut milk: Natural sweetness with tropical flavor notes
- Almond milk: Light, nutty taste with subtle sweetness
Sweeteners and Flavorings
Strategic sweetening enhances both taste and visual presentation without overwhelming the coffee’s natural flavors. We focus on natural options that complement rather than mask the coffee’s characteristics.
Natural Sweeteners:
- Vanilla extract: Enhances aroma with subtle sweetness
- Honey: Adds warmth and natural complexity
- Cinnamon: Provides spice notes and visual appeal when dusted on top
Flavor Enhancers:
- Natural syrups: Caramel, hazelnut, or maple for color contrast
- Cardamom: Aromatic spice for sophisticated flavor profiles
- Cocoa powder: Adds chocolate notes and visual garnish potential
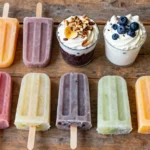
Garnishes and Toppings
Thoughtful garnishes transform ordinary coffee into Instagram-worthy masterpieces. We recommend selecting garnishes that complement your coffee’s flavor profile while adding visual interest.
Powder Garnishes:
- Cocoa powder: Classic dusting for mocha aesthetics
- Cinnamon powder: Warm spice with beautiful color contrast
- Matcha powder: Vibrant green for unique visual appeal
Textural Elements:
- Chocolate shavings: Adds dimension and luxury appeal
- Coffee crema: Natural foam for artistic designs
- Whipped cream: Creates height and layered textures
- Edible flowers: Delicate petals for elegant presentation
- Coffee beans: Whole beans as decorative elements
- Caramel drizzle: Creates stunning swirl patterns
Instructions

Now that we have our equipment and ingredients ready, let’s jump into the step-by-step process of creating aesthetic coffee that’s both delicious and visually stunning. We’ll walk through each phase carefully to ensure your coffee turns out perfectly every time.
Prep Your Workspace
We begin by cleaning and organizing our coffee-making area to create a visually appealing and efficient space. This foundation sets the stage for our entire brewing process.
Set up your quality equipment such as a Chemex, French press, or pour-over setup on a clean surface. These brewing devices are known for their sleek design and clean brewing process, making them perfect for aesthetic coffee preparation.
Rinse your filters before use to avoid paper taste and ensure clarity in the final brew. This simple step prevents any unwanted flavors from affecting our coffee’s pure taste profile.
Arrange your workspace with all necessary tools within easy reach, including your grinder, scale, and kettle. A well-organized station not only looks professional but also helps us maintain consistency throughout the brewing process.
Choose Your Coffee Base
We start with fresh, high-quality specialty coffee beans to maximize both flavor and aroma in our aesthetic coffee creation. The quality of our beans directly impacts the final result.
Grind beans just before brewing to preserve the best aroma and flavor compounds. Match your grind size to your chosen brewing method using these guidelines:
| Brewing Method | Grind Size | Reference |
|---|---|---|
| French Press | Coarse | Sea salt texture |
| Chemex/Large Pour-over | Medium-coarse | Kosher salt texture |
| Espresso/Turkish Coffee | Fine | Table salt texture |
Select medium roast beans for balanced flavor, especially when using a Chemex brewing method. Medium roasts provide the perfect balance of acidity and body that translates beautifully in both taste and visual presentation.
Measure your coffee using a digital scale for precision. We recommend a ratio of about 45g coffee to 720ml water for optimal extraction and visual clarity.
Perfect Your Brewing Technique
We use filtered or bottled water heated to about 200°F (93°C) to avoid off-flavors and maintain coffee purity. Water quality significantly impacts both taste and the visual clarity of our final brew.
For Chemex brewing, which produces an aesthetic and smooth cup, follow these steps:
Place your rinsed filter in the Chemex with the triple-fold side facing the spout. Add your medium-coarse grounds in the center of the filter.
Pour a small amount of hot water over the grounds to bloom them for 30 seconds. This releases trapped CO2 and creates an even extraction foundation.
Slowly pour the remaining water in a circular motion over 3 to 5 minutes, maintaining steady control. Keep the water level consistent and avoid pouring directly onto the filter edges.
For pour-over methods, we control variables meticulously to achieve clarity and sweetness in every cup. Maintain consistent pouring speed and circular motions for even saturation.
French press users should steep coarse grounds for 4 to 5 minutes before pressing slowly and steadily. This timing produces a full-bodied cup with rich visual appeal.
Avoid keeping coffee on a heating plate to prevent bitterness that can affect both taste and appearance. Instead, transfer brewed coffee immediately to a thermos to maintain optimal temperature without burning the delicate flavors.
Transfer your finished coffee to clear, elegant vessels like glass cups or ceramic mugs that showcase the beautiful color and clarity you’ve achieved through careful brewing.
Aesthetic Coffee Recipes

We’ll explore four signature aesthetic coffee recipes that transform your daily brew into visually stunning masterpieces. These techniques combine artistic presentation with delicious flavors to create Instagram-worthy coffee experiences.
Classic Latte Art
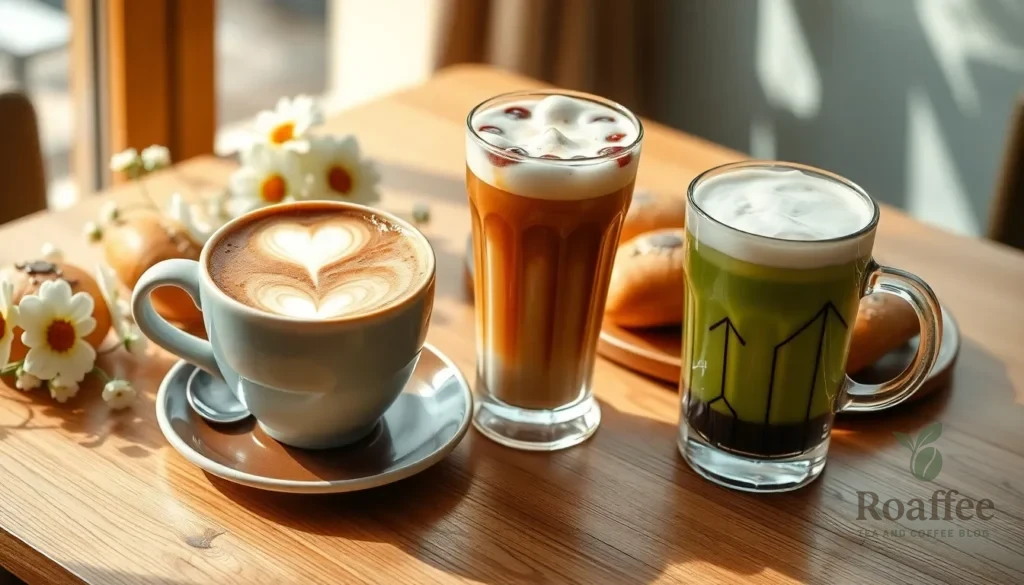
Master the art of free pouring steamed milk into espresso to create elegant designs like hearts, rosettas, and tulips. Begin by pouring milk from a height of 4-5 inches to properly mix the espresso and milk foundation. Lower your pitcher close to the cup surface and increase your pouring speed to create the signature “fan” effect that forms beautiful designs.
Heart Design: Pour milk steadily into the center of your cup, then finish with a quick downward cut through the foam to create the classic heart shape.
Rosetta Pattern: Rock your pitcher gently side to side while pouring to form delicate leaf-like petals, completing the design with a central cut that creates the stem.
Stacked Hearts: Layer small hearts slightly higher in the cup, finishing with a diagonal cut that produces a neat cascading stack effect.
We recommend using smooth rocking motions rather than fast wiggling movements to avoid unwanted striations in your latte art. This technique ensures clean, professional-looking designs that showcase your barista skills.
Dalgona Coffee
Create this trending whipped coffee by combining equal parts instant coffee and sugar with double the volume of hot water. Use spray-dried instant coffee for the best froth formation and most stable peaks. Whip the mixture using a handheld milk frother until it reaches a fluffy, cloud-like consistency that holds its shape.
Pour this golden whipped coffee over cold milk and ice to achieve the signature layered appearance. The contrast between the dark coffee foam and white milk creates a stunning visual effect that photographs beautifully.
For a creative twist, combine dalgona with matcha to create Matcha Dalgona Coffee. This variation features distinct green and brown layers that add vibrant color contrast to your aesthetic coffee presentation.
Iced Coffee with Layered Effects
Achieve striking visual layers by carefully pouring espresso or cold brew over milk and ice without mixing the components. Pour your coffee slowly and steadily to maintain distinct separation between the dark coffee and lighter milk layers.
This technique works exceptionally well with different milk alternatives, each creating unique color gradients. Oat milk produces creamy beige tones, while coconut milk creates stark white contrasts against dark coffee.
Temperature control plays a crucial role in maintaining clean layers. Use chilled milk and freshly brewed coffee that has cooled slightly to prevent immediate mixing when the liquids meet.
Matcha Coffee Fusion
Combine vibrant green matcha tea with rich coffee for a visually striking fusion that offers complex flavors and stunning presentation. This technique requires careful layering and proper whisking of matcha powder to achieve smooth texture and brilliant color.
Whisk your matcha powder with a small amount of hot water until completely smooth and froth-free. Layer this vibrant green mixture over or under your coffee base, depending on your preferred visual effect.
Serve this fusion iced with distinct green matcha layers and brown coffee or dalgona foam on top. The color contrast creates an eye-catching presentation that showcases both ingredients while delivering a unique taste experience that balances earthy matcha notes with bold coffee flavors.

Styling and Presentation Tips

We believe that mastering the art of coffee presentation transforms every cup into a visual masterpiece. These professional styling techniques will help you create consistently stunning coffee presentations that captivate before the first sip.
Color Coordination
Our approach to color coordination begins with understanding coffee’s natural palette of rich browns, creams, and deep blacks. We recommend building your color scheme around these foundation tones to create harmonious presentations that feel both intentional and inviting.
Monochromatic schemes work beautifully when we focus on varying shades of brown and beige throughout our setup. This approach creates depth while maintaining visual cohesion that draws attention to your coffee’s natural beauty.
Analogous color combinations offer another powerful option as we incorporate warm reds and oranges alongside coffee tones. These colors naturally complement each other and enhance the cozy, welcoming atmosphere we want to create.
Neutral or achromatic colors like white, gray, and black serve as perfect backdrops that keep our focus squarely on the coffee itself. We find these combinations particularly effective for highlighting intricate latte art and rich crema textures.
Complementary contrasts create dramatic visual impact when we strategically introduce blue or green elements into our presentation. These opposing colors make the warm coffee tones pop visually and create memorable, eye-catching compositions.
Props and Accessories
Strategic prop selection elevates our coffee presentations without overwhelming the main subject. We carefully choose accessories that enhance rather than compete with our beautifully crafted beverages.
Coffee beans scattered thoughtfully around the cup add authentic texture and reinforce the artisanal quality of our brew. Small plants or succulents introduce natural elements that complement coffee’s organic appeal.
Textured napkins and wooden trays provide visual interest while maintaining the sophisticated aesthetic we’re creating. These elements add layers of texture that make our photographs more captivating and professional.
Elegant spoons, sugar cubes, and milk pitchers should align with our chosen color scheme to maintain visual harmony. We select pieces that feel intentional rather than random additions to our setup.
Balance remains crucial as we arrange our props to support rather than distract from our coffee presentation. Every element should serve a purpose in creating the overall aesthetic we’re pursuing.
Lighting Considerations
Natural light provides the most flattering illumination for our coffee presentations, revealing textures and colors authentically. We position our setups near windows during golden hour for the most appealing results.
Soft, diffused artificial lighting works well when natural light isn’t available, helping us highlight the coffee’s rich textures and vibrant colors consistently. Ring lights or softbox setups create even illumination without harsh shadows.
Harsh shadows and bright reflections can distract from our coffee’s beauty, so we use diffusers or bounce cards to create gentle, even lighting. This approach ensures our latte art and crema details remain clearly visible.
Positioning our lighting to enhance exact elements like latte art or espresso crema creates focal points that draw viewers’ attention. We experiment with different angles to find the most flattering perspective for each presentation.
Warm lighting tones with yellowish qualities convey the coziness and comfort we associate with great coffee experiences. These warmer tones enhance our coffee’s natural colors and create an inviting atmosphere that makes viewers want to reach for their own cup.
Photography Tips for Your Aesthetic Coffee

Now that we’ve mastered the art of creating visually stunning coffee, let’s capture its beauty through expert photography techniques. We’ll transform your aesthetic coffee creations into professional-looking images that showcase every detail.
Camera Settings
We achieve sharp, professional-looking coffee photos by adjusting our camera settings strategically. Wider apertures between f/1.8 and f/4 create shallow depth of field that blurs backgrounds while keeping our coffee in crisp focus with beautiful bokeh effects.
Higher shutter speeds capture intricate details like steam curls and delicate latte art without motion blur. We always clean our camera lens and coffee-related props before shooting to eliminate distracting marks or fingerprints that can ruin otherwise perfect shots.
Our camera’s exposure settings should prioritize the coffee as the main subject while maintaining natural lighting characteristics. We test different ISO levels to balance grain with clarity, ensuring our coffee’s textures remain vivid and appealing.
Angles and Composition
Experimenting with various angles reveals different storytelling perspectives for our coffee photography. We shoot from above using flat lay techniques to capture the complete scene, or position ourselves at eye level to highlight coffee layers and intricate textures.
Moving the cup to different positions and changing our shooting location helps us discover fresh perspectives that keep our images ever-changing. We apply the rule of thirds by placing our coffee off-center and balancing the composition with complementary props like books, pastries, or elegant utensils.
External elements tell compelling stories about our coffee experience. We include barista tools or carefully chosen surroundings that suggest the coffee’s intended audience, adding narrative depth beyond the beverage itself.
Zooming in close on coffee textures or related objects creates emotional connection and mystery. We embrace slight graininess when it adds character to our close-up shots, focusing on details that make viewers want to taste what they see.
Editing Techniques
We enhance our coffee photos through thoughtful editing that maintains natural appeal while boosting visual impact. Adjusting warmth and contrast makes our coffee look inviting and aromatic, drawing viewers into the experience.
Balancing brightness and shadows emphasizes important details without losing the natural light feel that makes coffee photography authentic. We carefully adjust these elements to highlight steam, foam patterns, and rich coffee colors.
Subtle saturation increases bring out rich coffee tones without making images look artificial. We apply soft filters for cozy atmospheres when appropriate, ensuring our edits complement rather than overpower the coffee’s natural beauty.
Our editing workflow focuses on creating images that tell stories beyond the cup itself. We maintain the coffee’s authentic character while improving its most photogenic qualities through precise adjustments.
Make-Ahead Tips

Creating aesthetic coffee becomes effortless when we prepare key elements in advance. We can streamline our morning routine while maintaining the visual appeal that makes our coffee Instagram-worthy.
Pre-Grinding Coffee Beans
We recommend grinding our beans to precise specifications the night before to ensure consistent aesthetic results. Store freshly ground coffee in an airtight container to preserve flavor and aroma. Different brewing methods require exact grind sizes for optimal visual clarity:
| Brewing Method | Grind Size | Storage Time |
|---|---|---|
| Chemex | Medium-coarse (like kosher salt) | Up to 12 hours |
| AeroPress | Medium-fine | Up to 8 hours |
| French Press | Coarse | Up to 12 hours |
| Pour Over | Medium | Up to 10 hours |
Temperature Control Setup
We should prepare our water temperature control system ahead of time for consistent brewing results. Electric kettles with temperature control allow us to maintain the ideal 200°F (93°C) brewing temperature. Fill the kettle the night before and set it to the desired temperature in the morning for immediate use.
Milk and Foam Preparation
We can pre-steam milk and store it in the refrigerator for up to 24 hours before use. Reheat steamed milk gently to 140°F (60°C) before creating latte art. Prepare frothy milk or crema separately and store in small containers for easy access during presentation.
Equipment Staging
We organize our brewing equipment the evening before to create smooth morning workflows. Clean and dry all devices including Chemex carafes, AeroPress components, and siphon brewers. Position brewing devices prominently since they contribute to the overall aesthetic experience during preparation.
Photography Setup
We prepare our photography station in advance by selecting backgrounds and props that complement our coffee presentation. Clean glass cups and elegant ceramic mugs should be positioned near natural light sources. Arrange garnish elements like cinnamon sticks, star anise, or fresh flowers in easily accessible containers for quick styling.
Storage and Serving Suggestions

Proper Coffee Bean Storage
We store our coffee beans in airtight containers to preserve their freshness and maintain the flavor profiles essential for aesthetic coffee. Glass or ceramic containers with tight seals work best for limiting oxygen exposure which causes oxidation and flavor deterioration.
Opaque containers protect our beans from light damage by keeping them in dark cupboards away from heat sources like stoves or ovens. Heat and UV light degrade coffee oils and compromise the rich flavors we need for visually stunning brews.
Our ideal storage environment maintains cool dry conditions in a pantry away from moisture and temperature fluctuations. We avoid refrigeration and freezing unless beans are vacuum-sealed and frozen in small portions since these methods introduce moisture and unwanted odors that negatively affect coffee quality.
Serving Recommendations for Maximum Impact
We serve our aesthetic coffee promptly to enjoy peak flavor and maintain the visual elements that make each cup Instagram-worthy. Attractive cups that showcase the coffee’s crema or layered appearance enhance the overall presentation significantly.
Our serving strategy considers the entire environment by incorporating minimalist or rustic aesthetics with wooden trays and linen napkins. Matching spoons and complementary accessories create a cohesive visual experience that elevates the coffee presentation beyond the beverage itself.
We choose glassware that complements the drink’s color and texture while allowing the layered elements to shine through. Clear glass vessels work particularly well for drinks with distinct visual layers while ceramic cups provide an elegant backdrop for latte art.
Optimal Serving Temperature and Timing
| Coffee Type | Serving Temperature | Optimal Serving Window |
|---|---|---|
| Espresso-based drinks | 150-160°F | 2-3 minutes after brewing |
| Pour-over coffee | 140-150°F | 3-5 minutes after brewing |
| Iced coffee creations | 35-40°F | Immediately after preparation |
| Matcha coffee fusion | 130-140°F | 1-2 minutes after mixing |
We maintain proper serving temperatures to preserve both flavor integrity and visual appeal. Hot drinks lose their aesthetic qualities when served too late while cold beverages can develop condensation that obscures beautiful layering effects.
Environmental Considerations
Our serving environment plays a crucial role in showcasing aesthetic coffee creations. We position our coffee station near natural light sources while avoiding direct sunlight that can create harsh shadows or cause rapid temperature changes.
We prepare our serving area with clean surfaces and complementary backgrounds that enhance rather than compete with the coffee’s visual elements. Neutral colors and simple textures provide the perfect canvas for our carefully crafted beverages.
Storage containers remain easily accessible during our morning routine to maintain the seamless flow from bean to cup. We organize our equipment and serving pieces to create an efficient workspace that supports consistent aesthetic results.
Conclusion
Creating aesthetic coffee at home isn’t just about impressing your social media followers—it’s about transforming your daily ritual into something truly special. We’ve shown you that with the right techniques equipment and a bit of creativity you can create visually stunning coffee that rivals any café.
The beauty of aesthetic coffee lies in its accessibility. You don’t need expensive equipment or years of training to create these masterpieces. Armed with our step-by-step guides styling tips and photography insights you’re ready to elevate every cup.
Remember that practice makes perfect. Start with one technique master it then gradually incorporate more advanced methods. Soon you’ll be creating coffee that’s as beautiful as it is delicious—turning every morning into an artful experience worth savoring.
Frequently Asked Questions
What makes coffee aesthetic?
Aesthetic coffee combines visual appeal with great taste through color contrast, texture variation, and artistic presentation. Key elements include rich espresso browns, golden caramel swirls, vibrant latte art, and layered textures like velvety microfoam. The overall composition considers background, lighting, and props to create an Instagram-worthy coffee experience that transforms your ordinary cup into a photogenic masterpiece.
What equipment do I need for aesthetic coffee?
Essential equipment includes high-quality coffee beans, a precision grinder, digital scale, and gooseneck kettle for controlled pouring. You’ll also need brewing devices like espresso machines or pour-over brewers, filtered water, thermometers, and photography tools. Clean glassware, proper lighting equipment, and latte art tools enhance visual presentation, while high-resolution cameras capture intricate details.
What ingredients are best for creating stunning aesthetic coffee?
Start with quality coffee beans matched to your preferred brewing method. Choose appropriate roast levels (light, medium, or dark) based on desired flavor profiles. Select the right milk or alternatives like whole milk, oat milk, or coconut milk for creamy textures essential for latte art. Natural sweeteners like vanilla extract and honey, plus garnishes like cocoa powder and edible flowers, enhance both taste and visual appeal.
How do I create perfect latte art?
Perfect latte art requires properly steamed milk with velvety microfoam and precise pouring technique. Start with fresh, cold milk and steam to 150-160°F. Pour steadily from a height, then bring the pitcher closer to the surface while creating gentle movements. Practice basic designs like hearts and rosettas before attempting complex patterns. Temperature control and milk texture consistency are crucial for successful results.
What are the best photography tips for aesthetic coffee?
Use natural light whenever possible and avoid harsh shadows with soft, diffused lighting. Experiment with wider apertures for depth of field and higher shutter speeds to capture intricate details. Try different angles and apply the rule of thirds for compelling composition. When editing, enhance textures and colors while maintaining natural appeal. Focus on highlighting the coffee’s unique characteristics without over-processing.
How can I prepare aesthetic coffee ingredients ahead of time?
Pre-grind coffee beans to precise specifications and store in airtight containers for optimal freshness. Use opaque, airtight containers to protect beans from oxidation and light damage. Prepare garnishes like chocolate shavings in advance. Set up your workspace with proper lighting and attractive glassware. However, always brew coffee fresh and steam milk just before serving to maintain quality and visual appeal.
What’s the difference between light, medium, and dark roast for aesthetic coffee?
Light roasts offer bright, acidic flavors with floral notes and maintain more origin characteristics, providing excellent clarity for pour-over methods. Medium roasts balance acidity and body with caramel sweetness, perfect for most brewing methods. Dark roasts deliver bold, smoky flavors with less acidity, ideal for espresso-based drinks. Each roast level creates different visual richness and color depth in your final presentation.
How do I create layered iced coffee drinks?
Start with cold brew or strong coffee as your base. Use different density liquids like flavored syrups, milk alternatives, or cream to create distinct layers. Pour slowly over the back of a spoon to maintain separation. Ice should be added strategically to maintain layer integrity. Temperature differences between liquids help maintain visual separation, creating stunning gradient effects perfect for social media photos.