We’ve all been mesmerized by those gorgeous coffee designs that baristas create with seemingly effortless skill. Those delicate hearts, leaves, and swirls that transform a simple cup of coffee into a work of art don’t have to remain a mystery. Coffee art – or latte art as it’s professionally known – is an achievable skill that’ll elevate your home brewing game and impress everyone who walks into your kitchen.
The magic behind these stunning designs lies in understanding milk texture and mastering the pour. We’re talking about creating microfoam so smooth it’s like silk and learning the wrist movements that turn your morning ritual into a creative expression. Whether you’re dreaming of opening your own café or simply want to add some flair to your daily cup, these techniques will transform you from coffee drinker to coffee artist.
Ready to turn your kitchen into a mini coffeehouse? Let’s jump into the essential tools and techniques that’ll have you creating Instagram-worthy coffee designs in no time.
Essential Tools and Equipment
Creating stunning coffee designs requires the right tools to achieve professional-looking results. We’ve compiled the essential equipment needed to transform your coffee-making setup into a latte art studio.
Espresso Machine or Coffee Maker
A quality espresso machine serves as the foundation for exceptional coffee designs. We recommend machines with consistent pressure and temperature control to produce rich espresso shots with proper crema formation. Manual espresso machines offer greater control over extraction timing and pressure while semi-automatic models provide convenience without sacrificing quality.
Moka pots and French press coffee makers work as alternatives for home baristas on a budget. These brewing methods produce concentrated coffee that pairs well with textured milk. Strong drip coffee can also substitute for espresso when creating simpler designs that don’t require the thick crema layer.
Milk Frother or Steam Wand
Steam wands attached to espresso machines provide the most precise control for creating microfoam. We use the steam wand to heat milk to 150-160°F while incorporating air to achieve velvety texture. The positioning and angle of the steam wand determines foam density and milk temperature consistency.
Handheld milk frothers offer portability and affordability for basic foam creation. Electric milk frothers heat and texture milk automatically with consistent results. Manual pump frothers require more effort but give greater control over foam thickness and texture density.
Coffee Cups and Saucers
Wide-mouth ceramic cups between 5-8 ounces work best for latte art designs. We choose cups with rounded bottoms that allow milk to flow smoothly during pouring. The cup’s interior color should contrast with coffee and milk to showcase design details clearly.
Porcelain and ceramic materials retain heat effectively while providing stable surfaces for intricate patterns. Cup handle positioning affects pouring comfort and design precision. We avoid glass cups that cool quickly and narrow-mouth mugs that restrict milk flow patterns.
Pouring Pitchers
Stainless steel milk pitchers with spouts ranging from 12-20 ounces accommodate different serving sizes. We select pitchers with narrow spouts for precise control and wider spouts for faster pouring techniques. The pitcher’s weight and balance affect pouring stability and design accuracy.
Spout shape determines milk flow characteristics and pattern formation. Rounded spouts create smooth continuous streams while pointed spouts enable detailed line work. We prefer pitchers with comfortable handles that allow steady grip during complex pouring movements.
Toothpicks and Skewers
Wooden toothpicks serve as essential tools for creating detailed patterns and fixing design imperfections. We use toothpicks to drag through milk foam and create heart shapes feathers and geometric patterns. The pointed tip allows precise manipulation of foam surfaces without disturbing the coffee underneath.
Bamboo skewers work well for larger designs and broader stroke patterns. Metal tools can scratch cup surfaces while plastic alternatives may not provide sufficient precision. We keep multiple toothpicks available since foam residue can affect subsequent design attempts.
Ingredients

Creating stunning coffee designs requires carefully selected ingredients that work together to produce the perfect canvas for your artistic expression. We’ll focus on quality components that ensure both exceptional flavor and ideal texture for latte art success.
Coffee Beans or Ground Coffee
Fresh coffee beans form the foundation of any exceptional latte art creation. We recommend selecting medium to dark roast beans that produce rich crema when brewed as espresso. Single-origin beans from Central or South American regions offer balanced flavors that complement milk beautifully.
Ground coffee should maintain a fine consistency similar to table salt for optimal extraction. We suggest grinding beans immediately before brewing to preserve essential oils and achieve maximum crema production. Pre-ground coffee works when freshly opened but loses its ability to create thick crema within days of grinding.
Espresso blends specifically designed for milk-based drinks deliver the bold flavor profile needed to cut through steamed milk. We prefer beans roasted within two weeks of use for peak freshness and crema formation.
Fresh Milk
Whole milk creates the ideal microfoam texture essential for smooth latte art designs. The fat content in whole milk produces stable foam that maintains its consistency throughout the pouring process. We find that milk with 3.25% fat content delivers optimal results for beginners and experienced baristas alike.
Temperature plays a crucial role in milk preparation. We heat milk to 150-160°F for the perfect balance of sweetness and foam stability. Cold milk straight from the refrigerator steams more effectively than milk stored at room temperature.
Alternative milk options like oat milk and soy milk can create acceptable foam for latte art. We recommend barista-exact versions of these alternatives as they contain added stabilizers that improve foaming capabilities.
Optional Flavor Syrups
Vanilla syrup enhances coffee sweetness without overwhelming the natural espresso flavor. We add 1-2 pumps directly to the espresso shot before pouring steamed milk. Caramel syrup provides rich sweetness that pairs exceptionally well with darker roasted beans.
Flavored syrups should complement rather than mask the coffee’s natural characteristics. We suggest starting with half the recommended amount and adjusting to taste preferences. Sugar-free options work equally well for those monitoring their sugar intake.
Homemade simple syrups infused with herbs or spices offer unique flavor profiles. We create custom blends using equal parts sugar and water heated with vanilla beans or cinnamon sticks for personalized coffee experiences.
Cocoa Powder or Cinnamon
Unsweetened cocoa powder creates elegant finishing touches for completed latte art designs. We dust a light layer over foam patterns to enhance visual appeal and add subtle chocolate notes. Dutch-processed cocoa provides the smoothest application and richest color contrast.
Ground cinnamon adds warmth and aromatic complexity to coffee designs. We use fine-ground cinnamon for even distribution and prefer Ceylon cinnamon for its delicate sweetness. A small mesh strainer ensures uniform dusting without clumping.
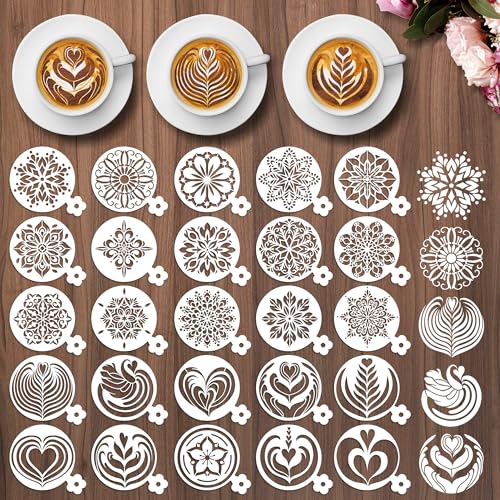
Stencils help create precise patterns when applying cocoa powder or cinnamon. We place paper stencils over completed foam designs and dust lightly for professional-looking results. Multiple spice combinations create unique flavor profiles that complement different coffee bean origins.
Preparing the Perfect Base

Success in coffee art depends entirely on mastering the foundation elements that create your canvas. We need to focus on three critical components that work together to produce professional-quality latte art.
Brewing Strong Espresso
We pull espresso shots with precision to create the rich base our designs require. The ideal extraction time ranges from 25 to 30 seconds with a yield of 1.5 to 2 ounces of espresso per shot. We tamp the coffee grounds with approximately 30 pounds of pressure to ensure even water distribution through the coffee bed.
Fresh crema forms the golden layer that supports our milk designs. We aim for crema that maintains its color and consistency for at least 90 seconds after extraction. The espresso should have a syrupy consistency that coats the back of a spoon when we test it.
Temperature control plays a crucial role in extraction quality. We maintain water temperature between 195°F and 205°F during brewing to extract the optimal flavor compounds without burning the coffee. Our espresso machine pressure should register between 8.5 and 9.5 bars for consistent extraction.
Creating Microfoam Milk
We transform cold milk into velvety microfoam through controlled steaming techniques. The milk pitcher should be filled to approximately one-third capacity to allow room for expansion during the frothing process. We position the steam wand tip just below the milk surface and create a whirlpool motion to incorporate air evenly.
The texturing phase lasts 3 to 5 seconds while we introduce air into the milk. We listen for a paper-tearing sound that indicates proper air incorporation. After achieving the desired volume increase we plunge the steam wand deeper into the milk to heat and integrate the foam.
Microfoam quality determines our design success. We achieve the perfect texture when the milk resembles wet paint and flows smoothly without visible bubbles. The foam should be dense enough to support intricate patterns yet fluid enough to blend seamlessly with the espresso crema.
Achieving the Right Temperature
We monitor milk temperature carefully to ensure optimal pouring consistency and flavor balance. The ideal serving temperature for steamed milk ranges from 150°F to 160°F. We use our hand as a temperature guide by holding the pitcher until it becomes too hot to touch comfortably.
| Temperature Range | Milk Texture | Design Quality |
|---|---|---|
| 140°F – 150°F | Slightly loose | Good for beginners |
| 150°F – 160°F | Perfect consistency | Ideal for detailed designs |
| 160°F – 170°F | Thick and sticky | Difficult to pour |
Timing becomes essential when coordinating espresso extraction with milk preparation. We start steaming milk immediately after beginning our espresso shot to ensure both components finish simultaneously. The milk should be ready within 30 seconds of our espresso extraction completing.
We test our milk temperature by checking that the pitcher bottom feels warm but not scalding against our palm. Overheated milk above 170°F develops a burnt flavor and loses its ability to create smooth microfoam. Properly heated milk maintains its sweet taste and creamy texture that enhances our coffee designs.
Basic Latte Art Techniques

Now that we’ve mastered the fundamentals of espresso extraction and microfoam creation, we can begin crafting beautiful designs. These essential pouring techniques form the foundation for all latte art patterns and require consistent practice to achieve professional results.
The Pour Method
We start every latte art design by positioning our pitcher at the proper angle and height above the cup. The milk should flow steadily from the pitcher’s spout in a consistent stream without interruption. Our pouring technique relies on three key elements: height, flow rate, and pitcher position.
We hold the pitcher approximately 3-4 inches above the cup surface during the initial pour. This height allows the milk to penetrate through the crema and blend with the espresso below. The flow rate remains controlled and steady throughout the entire process.
We adjust our pitcher angle to maintain a smooth pour while gradually bringing the spout closer to the cup surface. The transition from high pour to low pour creates the contrast needed for visible patterns. Our wrist movements should be fluid and deliberate rather than rushed or jerky.
Free Pour Heart Design
We create the heart design by starting with a steady pour from a higher position to establish the base. The milk stream should target the center of the cup while maintaining consistent flow. Once we’ve filled the cup about halfway, we lower the pitcher closer to the surface.
We increase the flow rate slightly as the pitcher approaches the crema surface. This action creates the rounded bottom portion of the heart shape. The milk will begin to spread outward and form a white circle against the darker espresso background.
We complete the heart by quickly drawing the pitcher through the center of the circle toward the cup’s edge. This swift motion creates the pointed top of the heart while maintaining the rounded base. Our final movement should be confident and decisive for a clean heart shape.
Free Pour Leaf Design
We begin the leaf pattern with the same initial pour technique used for the heart design. The milk stream flows from a higher position into the cup’s center until we reach approximately one-third capacity. We then lower the pitcher and increase the flow rate to create the leaf’s main body.
We create the leaf’s distinctive segments by gently moving the pitcher side to side while maintaining steady flow. These subtle movements produce the characteristic lines that run through the leaf pattern. Each oscillation should be small and controlled to avoid disrupting the overall shape.
We finish the leaf by drawing the pitcher straight through the design toward the cup’s edge. This final stroke creates the leaf’s stem while defining the overall pattern. Our movements should remain smooth and continuous throughout the entire process.
Free Pour Rosetta Design
We start the rosetta with the foundational pour technique, filling the cup to about one-third capacity from a higher position. The initial pour establishes the base layer needed for the complex rosetta pattern. We then bring the pitcher close to the surface and begin the oscillating motion.
We create the rosetta’s signature segments by moving the pitcher in small, rapid side-to-side motions while slowly moving backward across the cup. Each oscillation forms one segment of the rosetta pattern. The key lies in maintaining consistent rhythm and spacing between each movement.
We complete the rosetta by drawing the pitcher straight through all the segments toward the cup’s edge. This final stroke creates the rosetta’s stem and defines the overall pattern. Our timing must be precise to ensure all segments remain distinct and well-formed.
| Latte Art Design | Difficulty Level | Practice Time Required | Key Technique |
|---|---|---|---|
| Heart | Beginner | 1-2 weeks | Height transition |
| Leaf | Intermediate | 2-3 weeks | Side-to-side motion |
| Rosetta | Advanced | 4-6 weeks | Rhythmic oscillation |
Advanced Coffee Art Patterns

Having mastered the foundational heart, leaf, and rosetta designs, we can now explore more sophisticated patterns that showcase true artistry. These advanced techniques require precise timing and exceptional control over milk flow to create stunning visual masterpieces.
Tulip Design
The tulip pattern represents one of the most elegant advanced designs, requiring multiple heart formations stacked vertically. We begin by positioning our pitcher at a 45-degree angle approximately 3 inches above the cup’s surface. Pour steadily into the center while maintaining consistent flow rate until the cup reaches one-third full.
Lower the pitcher close to the milk surface and create the first heart by increasing flow rate and moving the pitcher slightly forward. Stop the flow abruptly and repeat this motion two more times, creating three distinct heart shapes stacked vertically. Each heart should be slightly smaller than the previous one, forming a natural progression.
For the final step, draw the pitcher through all three hearts from bottom to top in one smooth motion. This creates the tulip’s stem and transforms the individual hearts into beautiful tulip petals. The entire pattern typically takes 15-20 seconds to complete and requires consistent practice to achieve the perfect spacing between each heart.
Swan Design
Creating a swan design demands exceptional pitcher control and represents the pinnacle of latte art mastery. We start by pouring milk into the center of the cup from a height of 4 inches, maintaining steady flow until half full. This initial pour establishes the swan’s body foundation.
Position the pitcher close to the milk surface and create a large circle by moving the pitcher in a clockwise motion while maintaining steady flow. This forms the swan’s main body. Next, reduce flow rate and create a smaller circle adjacent to the first, forming the swan’s head.
The most challenging aspect involves creating the swan’s neck by drawing the pitcher in a graceful S-curve motion connecting the head to the body. We finish by drawing a straight line through the design to create the swan’s beak. The entire process requires approximately 25-30 seconds and demands perfect coordination between hand movements and milk flow.
Feather Pattern
The feather design combines intricate line work with flowing movements to create a sophisticated geometric pattern. We begin with a standard base pour, filling the cup one-third full from a 3-inch height to establish proper contrast between espresso and milk.
Lower the pitcher to the milk surface and create the central spine by pouring a steady line down the center of the cup. This forms the feather’s main shaft. Using quick side-to-side motions, we create alternating diagonal lines extending from the central spine. Each line should be approximately 1 inch long and positioned at 45-degree angles.
The key to perfecting this pattern lies in maintaining consistent spacing between each diagonal line while varying their lengths slightly. We create shorter lines near the top and longer lines toward the bottom, mimicking a natural feather’s structure. The entire design takes 20-25 seconds to complete and requires steady hand control throughout the intricate line work.
Etching and Drawing Techniques

We move beyond pouring techniques to explore the detailed artwork possible through precise etching and drawing methods. These advanced skills allow us to create intricate designs that showcase exceptional craftsmanship and artistic vision.
Using Toothpicks for Details
We transform basic latte art into stunning masterpieces using toothpicks to add fine details and corrections. Start by dipping a clean toothpick into the coffee crema or contrasting milk foam. Draw delicate lines through existing patterns to create texture and depth within your design.
Working quickly before the milk settles ensures clean lines and precise control. We create spider web effects by drawing lines from the center outward through heart or leaf patterns. Small dots and intricate borders become achievable through careful toothpick manipulation.
Sharp toothpicks produce thinner lines while slightly dulled points create broader strokes. We recommend keeping multiple toothpicks ready for complex designs that require different line weights. Practice your hand steadiness by creating simple geometric shapes before attempting more detailed artwork.
Creating Geometric Patterns
We achieve precise geometric designs through systematic etching techniques that require steady hands and careful planning. Begin with simple shapes like triangles and squares drawn into the milk foam surface. Use the toothpick to create clean angles and straight lines that form the foundation of your geometric artwork.
Concentric circles produce stunning visual effects when etched from the outside inward. We create these patterns by maintaining consistent pressure while rotating the toothpick in smooth circular motions. Hexagonal patterns emerge through careful placement of six evenly spaced points connected with straight lines.
Grid patterns offer sophisticated backgrounds for other design elements. We establish these by drawing parallel vertical lines followed by horizontal crosshatch marks. Diamond patterns result from rotating square grids 45 degrees and emphasizing diagonal connections.
| Pattern Type | Difficulty Level | Practice Time Required |
|---|---|---|
| Triangles | Beginner | 15-20 minutes |
| Concentric Circles | Intermediate | 30-45 minutes |
| Hexagons | Advanced | 60-90 minutes |
| Grid Patterns | Intermediate | 45-60 minutes |
Drawing Animals and Faces
We create charming animal figures and expressive faces through careful etching techniques that bring personality to our coffee creations. Cat faces begin with two triangular ears etched at the foam surface followed by circular eyes and a small triangular nose. Draw whiskers using light horizontal strokes extending from the nose area.
Simple bird silhouettes emerge through curved lines that suggest wing shapes and pointed beaks. We achieve these by starting with an oval body shape and adding triangular elements for the head and tail sections. Small dots create eyes that give life to our feathered friends.
Human faces require more advanced techniques but produce remarkable results. Start with an oval outline for the head shape followed by carefully placed dots for eyes and nose. We create smiling expressions through gentle curved lines that suggest happiness and warmth.
Bear faces combine circular shapes with small triangular ears positioned at the top. Draw a larger circle for the snout area and add small dots for the nose and eyes. We complete the design with curved lines that suggest a friendly expression.
Practice these techniques on paper first to develop muscle memory before attempting them on actual coffee surfaces. We recommend starting with simple shapes and gradually building complexity as your skills develop.
Stencil Method for Coffee Designs

Stenciling provides an accessible way to create consistent and detailed coffee designs without requiring advanced pouring skills. This technique allows us to achieve professional-looking results by applying powdered toppings through carefully crafted templates.
Making Your Own Stencils
Creating custom stencils gives us complete control over our coffee design library. We start by selecting food-grade cardstock or thin plastic sheets that can withstand moisture without warping. Drawing our desired pattern with a pencil allows us to refine the design before cutting.
Sharp create knives work best for cutting precise edges and intricate details. We recommend using a cutting mat to protect surfaces and ensure clean lines. Simple shapes like hearts and stars make excellent starting points for beginners.
More complex designs require patience and steady hands. We carefully cut away the areas where we want powder to fall through while leaving connecting bridges to maintain structural integrity. Testing each stencil on paper first helps us identify areas that need adjustment.
Storage becomes important once we build our stencil collection. We keep completed stencils flat between sheets of parchment paper to prevent warping and damage.
Using Pre-Made Stencils
Commercial coffee stencils offer convenience and professional quality for busy coffee enthusiasts. These ready-made options come in various materials including food-safe plastic and stainless steel that provide durability and easy cleaning.
We position the stencil approximately one inch above the coffee surface to prevent contact with hot liquid. Holding it steady with one hand creates a stable platform for even powder distribution. The distance helps achieve soft edges rather than harsh lines.
Multiple stencils can be layered to create complex designs. We apply the first pattern then carefully reposition for additional elements. This technique works particularly well for creating seasonal themes or personalized messages.
Cleaning pre-made stencils requires gentle washing with warm soapy water. We dry them thoroughly before storage to prevent rust on metal versions or warping on plastic ones.
Dusting with Cocoa Powder
Cocoa powder serves as our primary medium for stencil work due to its fine texture and rich color contrast. We use a fine-mesh shaker or small sieve to achieve even distribution across the stencil surface. The key lies in applying light consistent pressure while moving in circular motions.
Timing proves crucial for successful cocoa dusting. We apply the powder immediately after creating the milk foam base while the surface remains stable. Waiting too long allows the foam to settle and creates uneven results.
| Powder Type | Best Use | Application Method |
|---|---|---|
| Cocoa Powder | Dark contrast designs | Fine mesh shaker |
| Cinnamon | Warm spice accent | Light dusting |
| Powdered Sugar | Light colored patterns | Gentle sifting |
Alternative powders like cinnamon and powdered sugar expand our design possibilities. Cinnamon adds warmth and spice while providing a lighter brown tone. Powdered sugar creates white accents that work beautifully on darker coffee surfaces.
We lift the stencil straight up rather than sliding it away to maintain crisp edges. Quick decisive movements prevent smudging and keep the design boundaries sharp. Practice with different powder amounts helps us achieve the perfect density for each design.
Troubleshooting Common Issues

Even experienced baristas encounter challenges when creating coffee designs. We’ll address the most common problems and provide practical answers to elevate your latte art skills.
Fixing Poor Milk Texture
Dense foam with large bubbles occurs when we introduce too much air too quickly during the steaming process. We should position the steam wand just below the milk surface for the first few seconds then plunge it deeper to create microfoam.
Watery milk texture results from insufficient steaming time or low steam pressure. We need to steam until the milk reaches 150-160°F and develops a glossy paint-like consistency that flows smoothly.
Overly thick foam happens when we steam for too long or use too much air. We can fix this by gently tapping the pitcher on the counter and swirling the milk to integrate the foam before pouring.
Temperature plays a crucial role in achieving proper texture. We should never exceed 160°F as this scorches the milk and breaks down the proteins necessary for smooth microfoam.
Correcting Pouring Speed
Fast pouring creates turbulent milk flow that disrupts the crema and prevents pattern formation. We should start with a slow steady stream from a higher position then gradually increase speed as we lower the pitcher.
Slow pouring throughout the entire process results in the milk sinking through the crema without creating visible patterns. We need to increase our flow rate during the design phase while maintaining control.
Inconsistent pouring speed causes uneven patterns and broken lines in our designs. We can practice maintaining steady wrist movements and controlled breathing to achieve consistent flow rates.
The optimal pouring technique involves three distinct phases: piercing the crema slowly, increasing speed for base formation, and finishing with controlled movements for pattern completion.
Adjusting Coffee Strength
Weak espresso fails to support milk patterns because it lacks sufficient crema density. We should grind our beans finer and ensure proper tamping pressure to achieve a 25-30 second extraction time.
Over-extracted coffee creates bitter flavors that overpower the milk’s sweetness. We need to coarsen our grind slightly and reduce extraction time to maintain balance between coffee and milk.
Insufficient crema volume makes pattern creation nearly impossible. We should use freshly roasted beans within 2-4 weeks of roasting and maintain consistent brewing temperature between 195-205°F.
Coffee that’s too strong can mask the subtle flavors we want to highlight in our latte art. We can adjust the coffee-to-milk ratio or use a slightly lighter roast to achieve better flavor balance.
Practice Tips and Techniques

Success in latte art requires consistent practice and strategic approaches to skill development. We recommend establishing a structured routine that builds your abilities progressively while maintaining patience throughout your learning journey.
Starting with Simple Designs
Begin your latte art journey with basic shapes that establish fundamental pouring techniques. The heart design serves as our recommended starting point because it teaches proper pitcher positioning and milk flow control without requiring complex movements.
Focus on mastering the basic pour before attempting decorative elements. We suggest practicing the simple straight pour first, concentrating on creating smooth white milk against the dark espresso background. This foundation technique appears in nearly every latte art pattern and demands consistent practice.
Master the wobble motion by practicing gentle side-to-side movements with your pitcher. This basic technique creates the foundation for leaves, rosettas, and other flowing patterns. Start with slow, deliberate movements and gradually increase speed as your control improves.
Practice timing between espresso extraction and milk preparation to ensure both components remain at optimal temperatures. Fresh espresso maintains better crema for contrast while properly heated milk holds its microfoam texture longer during the pour.
Building Muscle Memory
Develop consistent wrist movements through repetitive practice sessions lasting 15-20 minutes daily. Muscle memory forms through regular repetition rather than occasional lengthy practice periods. We recommend shorter, focused sessions over marathon practice attempts.
Practice pouring motions without coffee using water in your pitcher to build hand positioning habits. This technique allows you to focus purely on movement patterns without wasting coffee ingredients. Fill your cup with water and practice heart patterns using plain water from your pitcher.
Create exact movement patterns for each design type and repeat them consistently. The rosetta requires alternating left-right movements while the heart demands a single decisive strike through the milk. Practice these distinct motions separately before combining them into complete designs.
Focus on maintaining steady hand positions throughout the entire pour. Inconsistent hand placement causes uneven milk distribution and distorted patterns. We suggest practicing in front of a mirror to observe your positioning and identify areas for improvement.
Recording Your Progress
Document your latte art attempts with photos to track improvement over time. Visual records help identify exact areas needing attention and celebrate progress milestones. Take photos from directly above your cup to capture pattern symmetry and detail accuracy.
Keep a practice journal noting which techniques work best for your setup and style. Record water temperature, milk type, and pouring speed combinations that produce your most successful attempts. This information becomes invaluable for replicating successful results.
Rate your attempts using a consistent scoring system to measure progress objectively. We recommend a simple 1-10 scale evaluating pattern clarity, symmetry, and overall appearance. This systematic approach helps identify improvement trends and skill development.
Set weekly goals for exact techniques or designs to maintain motivation and direction. Focus on mastering one pattern completely before moving to more complex designs. Achieving smaller milestones builds confidence and creates a stronger foundation for advanced techniques.
Review your recorded progress monthly to identify patterns in your improvement and adjust practice routines accordingly. Look for consistent problem areas that need additional attention and celebrate techniques that show important advancement.
Conclusion
Creating beautiful coffee designs transforms your daily brew into an artistic expression that brings joy to both the maker and the drinker. We’ve equipped you with the essential knowledge from selecting the right tools and ingredients to mastering basic patterns and advanced techniques.
Remember that latte art is a skill that develops through dedicated practice and patience. Start with simple designs like hearts and gradually work your way up to more complex patterns as your confidence grows.
Whether you choose traditional pouring methods etching techniques or convenient stenciling approaches the key is consistency in your practice routine. Document your progress set achievable goals and don’t be discouraged by initial imperfections.
Your coffee-making journey doesn’t end here. Keep experimenting with different techniques refining your skills and most importantly enjoying the process of creating these edible masterpieces that’ll impress family friends and yourself every morning.
Frequently Asked Questions
What equipment do I need to start making latte art at home?
You’ll need an espresso machine or budget-friendly alternative like a Moka pot, a milk frother or steam wand, wide-mouth ceramic cups, and a pouring pitcher with a precise spout. Optional tools include toothpicks for detailed work and stencils for consistent designs.
What type of milk works best for latte art?
Whole milk is ideal for latte art because it creates the best microfoam texture due to its fat content. The milk should be steamed to create velvety microfoam with tiny, uniform bubbles that blend smoothly with espresso.
How long does it take to learn basic latte art designs?
Basic designs like the heart can be learned in 2-3 weeks with daily practice. Intermediate patterns like the leaf require 4-6 weeks, while advanced designs like the rosetta may take 2-3 months of consistent practice to master.
What’s the difference between pouring and etching techniques?
Pouring techniques create designs by manipulating milk flow and pitcher movements during the pour. Etching involves using tools like toothpicks to draw detailed patterns in the foam after pouring, allowing for more intricate and precise designs.
Can I use non-dairy milk for latte art?
Yes, some non-dairy alternatives work well for latte art. Oat milk and barista-blend plant milks are specifically formulated to create microfoam. However, they may require different steaming techniques and temperatures compared to whole milk.
How do I fix common latte art problems?
Common issues include dense foam (steam longer at lower temperature), watery milk (use fresher, colder milk), and poor pattern definition (adjust pouring speed and height). Temperature control and consistent practice are key to solving most problems.
What’s the best way to practice latte art without wasting coffee?
Practice pouring motions with water and dish soap to simulate milk texture. Use short, focused 15-20 minute sessions, document your progress with photos, and set weekly goals. Start with simple designs before advancing to complex patterns.
