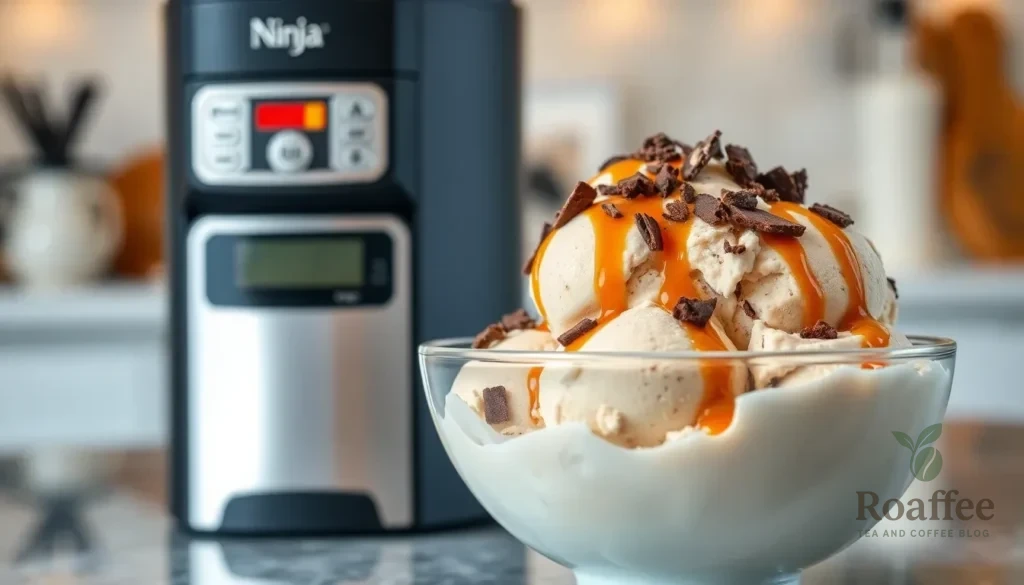
We’ve discovered the perfect solution for coffee lovers who crave that rich café flavor in frozen form. This Ninja Creami coffee ice cream recipe transforms your morning brew into a luxurious dessert that rivals any premium ice cream shop. The beauty lies in how the Ninja Creami creates that perfect creamy texture without the hassle of traditional churning methods.
What makes this recipe absolutely irresistible is its intense coffee flavor that doesn’t get lost in sweetness. We use real brewed coffee and a touch of espresso to create depth that’ll wake up your taste buds. The result is a sophisticated frozen treat that’s perfect for after-dinner desserts or those moments when you need both caffeine and indulgence.
The best part? This recipe comes together in minutes with just a few simple ingredients you probably already have in your kitchen. Once you try this homemade version you’ll never go back to store-bought coffee ice cream again.
Ingredients
We’ve carefully selected each ingredient to create the perfect balance of coffee intensity and creamy texture in this Ninja Creami recipe. Our ingredient list keeps things simple while delivering maximum flavor impact.
For the Coffee Ice Cream Base
- 2 cups heavy cream
- 1 cup whole milk
- 3/4 cup granulated sugar
- 1/2 cup strong brewed coffee (cooled to room temperature)
- 2 tablespoons instant espresso powder
- 1 teaspoon vanilla extract
- 1/4 teaspoon salt
- 4 large egg yolks
Optional Mix-ins and Toppings
- 1/2 cup mini chocolate chips
- 1/4 cup crushed chocolate covered espresso beans
- 2 tablespoons coffee liqueur (such as Kahlúa)
- 1/4 cup caramel sauce (for swirling)
- 2 tablespoons cocoa powder (for dusting)
- Whipped cream for serving
- Chocolate shavings for garnish
Equipment Needed

The Ninja Creami Ice Cream Maker serves as the star of our kitchen arsenal for creating this rich coffee ice cream. This versatile appliance transforms frozen mixtures into smooth and creamy frozen desserts with its powerful churning mechanism.
A high-quality blender becomes essential for combining our coffee ice cream base ingredients into a perfectly smooth mixture. We recommend using a standard countertop blender to ensure all ingredients blend uniformly and create the ideal texture foundation.
An immersion blender offers an excellent alternative for those who prefer more control over the mixing process. This handheld tool allows us to blend ingredients directly in our mixing bowl while avoiding over-processing.
A large mixing bowl provides adequate space for whisking together our cream base and coffee components. We suggest using a bowl with at least 2-quart capacity to accommodate all ingredients comfortably.
The Ninja Creami pint containers are specifically designed for this machine and must be used for proper freezing and processing. These containers ensure our ice cream mixture freezes evenly and fits perfectly into the Ninja Creami for optimal churning results.
A whisk helps incorporate air into our mixture and ensures smooth blending of the egg yolks with the cream base. We find that a wire whisk works best for achieving the silky texture we desire.
Measuring cups and spoons guarantee accurate ingredient proportions for consistent results every time. Precise measurements become crucial when working with coffee concentrations and sweetener ratios.
A fine-mesh strainer can be helpful for removing any lumps from instant espresso powder or ensuring our coffee mixture remains perfectly smooth. This optional tool adds an extra layer of refinement to our final product.


Instructions

We’ll guide you through each step to create perfectly smooth and creamy coffee ice cream using your Ninja Creami. Our research-based method ensures optimal results every time.
Prep the Coffee Base
We begin by combining all our ingredients in the Ninja Creami pint container. Add the heavy cream, whole milk, granulated sugar, cooled strong brewed coffee, instant espresso powder, vanilla extract, and salt to the container. Whisk the mixture thoroughly until the sugar completely dissolves and all ingredients blend smoothly. For an ultra-smooth base, we recommend using a high-quality blender to ensure the instant espresso powder incorporates completely without any lumps.
Freeze the Base
We pour our blended coffee mixture into the Ninja Creami pint container, filling only to the designated fill line to prevent overflow during processing. Place the sealed container in the freezer for exactly 24 hours. The mixture must freeze completely solid for the Ninja Creami to process it properly. We always scrape off any excess mixture from the top before freezing to ensure optimal machine performance.
First Spin in Ninja Creami
We remove our frozen pint from the freezer and insert it securely into the Ninja Creami machine. Select the “Ice Cream” setting on your machine and process according to the manufacturer’s instructions. The first spin transforms our frozen base into the initial ice cream texture. After processing, we typically notice the mixture appears somewhat crumbly, which is completely normal at this stage.
Re-spin Process
We return the pint to the machine and use the “Re-spin” function to achieve our desired creamy consistency. Most coffee ice cream recipes require 1-2 additional re-spins to reach the perfect smooth texture. We continue this process until the ice cream reaches a creamy, scoopable consistency that meets our quality standards.
Add Mix-ins (Optional)
We can enhance our coffee ice cream with various mix-ins after achieving the perfect base texture. Add mini chocolate chips, crushed chocolate-covered espresso beans, or a drizzle of coffee liqueur by hand-mixing them gently into the finished ice cream. For liquid mix-ins like caramel sauce, we recommend using the “Mix-in” function if available on your Ninja Creami model. These additions create delightful flavor variations while maintaining the smooth texture we’ve worked to achieve.


Directions for Perfect Texture

Creating the perfect texture in your Ninja Creami coffee ice cream requires attention to detail and understanding the key factors that influence creaminess. We’ll guide you through the essential techniques and troubleshooting methods to achieve that silky smooth consistency every time.
Achieving Creamy Consistency
The foundation of creamy texture lies in the proper balance of fat and liquid components. We recommend using heavy cream or half and half as your primary fat source, paired with whole milk or strong brewed espresso for optimal creaminess. This combination provides the richness needed for a velvety smooth result.
Our freezing technique plays a crucial role in texture development. After whisking or blending all ingredients until completely smooth, we freeze the mixture in the Ninja Creami pint container on a flat surface for a minimum of 24 hours. This ensures thorough freezing throughout the entire mixture.
Processing methodology significantly impacts the final texture. We place the frozen pint into the Creami outer bowl, lock the lid securely, and select the ICE CREAM function for the initial spin. Most recipes require multiple re-spins to develop the desired velvety smoothness, typically 2-3 times for lighter milk-based formulations.
Sugar content affects both sweetness and texture maintenance. We incorporate granulated sugar, maple syrup, or preferred sweeteners to prevent hardness and maintain smooth consistency. Using espresso or strong brewed coffee rather than instant coffee enhances flavor without compromising the creamy texture.
Troubleshooting Common Issues
| Issue | Cause | Solution |
|---|---|---|
| Crumbly/Icy texture | Base mixture too frozen or dry | Add 1 tbsp milk to center well, then RE-SPIN until creamy |
| Overfilling pint | Air bubbles from blending cause overflow | Allow mixture to settle before freezing, do not exceed fill line |
| Ice cream too hard | Not enough sugar or fat | Adjust sweetener/fat ratio; use cream instead of only milk |
| Flavor too weak | Insufficient coffee or vanilla | Increase espresso/instant coffee and vanilla extract quantities |
When encountering crumbly or icy texture after the first spin, we add approximately 1 tablespoon of milk into the center well of the ice cream and use the RE-SPIN function. This technique smooths out the texture and eliminates any remaining ice crystals.
Overfilling issues typically occur when air bubbles from blending cause the mixture to expand beyond the fill line. We allow the blended mixture to settle completely before freezing and ensure we don’t exceed the maximum fill line on the pint container.
Hard ice cream results from insufficient sugar or fat content. We adjust the sweetener and fat ratios by incorporating more cream instead of relying solely on milk. This modification provides the necessary richness for proper texture development.
Weak flavor intensity can be resolved by increasing the espresso or instant coffee quantities along with vanilla extract. We recommend tasting the base mixture before freezing and adjusting these components to achieve your desired coffee strength.


Storage and Serving Tips

Proper storage techniques ensure our Ninja Creami coffee ice cream maintains its creamy texture and rich flavor for weeks. We recommend serving the ice cream immediately after processing for the best soft-serve consistency. The freshly spun texture delivers maximum creaminess and allows the coffee flavors to shine through perfectly.
Immediate Serving Guidelines
Our coffee ice cream reaches its optimal serving temperature right after the final re-spin cycle. We suggest adding toppings like chocolate chips, whipped cream, or caramel sauce at this stage for enhanced flavor combinations. The ice cream scoops easily when served fresh, creating beautiful portions for presentation.
Freezer Storage Methods
After serving, we need to prepare the remaining ice cream for proper freezer storage. Smooth the surface of the ice cream using a spoon to create an even layer. Press plastic wrap directly against the ice cream surface to prevent air exposure and freezer burn. Seal the pint container tightly with its original lid to maintain freshness.
Storage Duration:
| Storage Method | Duration | Quality |
|---|---|---|
| Freezer with proper sealing | Up to 2 weeks | Optimal flavor retention |
| Standard freezer storage | 1 week | Good quality |
| Without surface protection | 3-4 days | Declining texture |
Re-serving Frozen Ice Cream
We must re-spin frozen ice cream in the Ninja Creami before serving again. Remove the pint from the freezer and immediately process using the “Ice Cream” setting. This step restores the creamy texture and eliminates ice crystals that form during storage. Multiple re-spins may be necessary if the ice cream appears crumbly after initial processing.
Texture Troubleshooting
Freezers that run extremely cold can cause our ice cream to become overly hard or crumbly. We recommend adding a splash of milk before re-spinning to restore smoothness. This technique works particularly well when the ice cream has been stored for several days. The additional liquid helps achieve the perfect creamy consistency we desire.
Batch Preparation Tips
We can prepare multiple batches efficiently by freezing two pints simultaneously. Process each frozen pint consecutively in the Ninja Creami for fresh ice cream whenever needed. This method allows us to maintain a steady supply of homemade coffee ice cream without daily preparation.

Variations and Flavor Combinations

We’ve discovered that the beauty of this coffee ice cream recipe lies in its versatility and endless customization options. These flavor combinations will transform your basic coffee ice cream into gourmet frozen treats that rival any premium ice cream shop.
Mocha Coffee Ice Cream
We create this rich chocolate coffee masterpiece by adding 2 tablespoons of unsweetened cocoa powder to our base mixture. Blend the cocoa powder thoroughly with the coffee and cream to eliminate any lumps before freezing. For protein enthusiasts we recommend substituting vanilla protein powder with chocolate-flavored protein powder to boost nutrition while maintaining the mocha flavor profile.
After processing in the Ninja Creami we fold in 1/3 cup of mini chocolate chips using the mix-in function. The combination delivers an intense chocolate coffee flavor that satisfies both coffee lovers and chocolate enthusiasts. We find that using dark chocolate chips creates a more sophisticated taste while milk chocolate chips provide a sweeter balance.
Vanilla Coffee Swirl
We prepare this elegant variation by making our standard coffee ice cream base and adding vanilla elements during the final processing stage. Create a vanilla swirl by mixing 2 tablespoons of vanilla syrup with 1 tablespoon of heavy cream until smooth. After your coffee ice cream completes its initial spin we use the mix-in function to create beautiful vanilla ribbons throughout.
Alternatively we prepare a separate small batch of vanilla ice cream using the same base recipe but substituting the coffee with additional vanilla extract. We then layer spoonfuls of both flavors in the pint container before freezing. This method creates distinct vanilla and coffee layers that blend beautifully when processed together.
Espresso Chocolate Chip
We elevate our coffee ice cream by using concentrated espresso for maximum coffee intensity. Replace the regular brewed coffee with 1/2 cup of cooled double-strength espresso or increase instant espresso powder to 3 tablespoons for a bold flavor punch. The stronger coffee base provides the perfect foundation for chocolate additions.
After processing we incorporate 1/3 cup of chocolate chips using the Ninja Creami’s mix-in function. We recommend using a combination of mini chocolate chips and crushed chocolate-covered espresso beans for varied textures and complementary flavors. This creates delightful flavor contrasts as the bitter espresso balances the sweet chocolate elements perfectly.


Make-Ahead Instructions

Making coffee ice cream in advance ensures you always have a delicious frozen treat ready to enjoy. We recommend preparing your mixture at least 24 hours before you plan to serve it since proper freezing is essential for achieving the perfect texture in your Ninja Creami.
Freezing the Base
Pour your prepared coffee ice cream mixture into the Ninja Creami pint container and seal it tightly. Place the container on a flat surface in your freezer to prevent the mixture from tilting during the freezing process. The mixture must freeze for a minimum of 24 hours to solidify completely before processing.
Extended Storage Options
Your frozen coffee ice cream base can remain in the freezer for up to one month before churning. We suggest labeling each container with the date and flavor to keep track of multiple batches. This extended storage time allows you to prepare several pints in advance for parties or whenever you crave homemade coffee ice cream.
Processing Timeline
After the initial 24-hour freeze your ice cream is ready to process in the Ninja Creami. The churning process takes only a few minutes but may require 1-2 re-spins to achieve the desired creamy consistency. We recommend processing your ice cream shortly before serving for the best soft-serve texture.
Batch Preparation Strategy
Create multiple pints simultaneously by doubling or tripling the recipe and dividing the mixture between containers. This approach ensures you have various flavors ready or multiple servings of your favorite coffee ice cream. Each pint follows the same 24-hour freezing requirement regardless of how many you prepare at once.
Pre-Freezing Tips
Always freeze your pint containers on a level surface to maintain even distribution of ingredients. Keep the containers away from the freezer door where temperature fluctuations occur most frequently. We find that placing containers in the back of the freezer provides the most consistent freezing environment for optimal results.


Conclusion
We’ve shared everything you need to create the perfect coffee ice cream right in your kitchen using the Ninja Creami. This recipe delivers that rich café-quality flavor you’re craving while being surprisingly simple to make.
The beauty of this homemade approach lies in its versatility. Whether you stick with the classic version or experiment with our suggested variations you’ll have complete control over the intensity and flavor profile.
Your Ninja Creami transforms a few basic ingredients into a sophisticated dessert that rivals any premium ice cream shop. With proper storage techniques and our make-ahead tips you can always have this delicious treat ready to enjoy.
Once you taste this creamy coffee-infused creation you’ll understand why homemade always beats store-bought. Fire up that Ninja Creami and treat yourself to something truly special.
Frequently Asked Questions
How long does it take to make coffee ice cream in the Ninja Creami?
The actual processing time is just a few minutes, but the mixture needs to freeze for 24 hours before churning. Total time from start to finish is approximately 24 hours and 5 minutes, with most of that being hands-off freezing time.
What ingredients do I need for Ninja Creami coffee ice cream?
You’ll need 2 cups heavy cream, 1 cup whole milk, 3/4 cup granulated sugar, 1/2 cup cooled strong brewed coffee, 2 tablespoons instant espresso powder, 1 teaspoon vanilla extract, 1/4 teaspoon salt, and 4 large egg yolks.
Can I store homemade coffee ice cream in the freezer?
Yes, you can store it for up to one month in the freezer. Cover the surface with plastic wrap and seal the container tightly to prevent freezer burn. You’ll need to re-spin it in the Ninja Creami to restore the creamy texture before serving.
Why is my coffee ice cream crumbly after the first spin?
This is completely normal! The first spin typically produces a crumbly texture. Simply use the “Re-spin” function 1-2 additional times to achieve a smooth, creamy consistency. Multiple re-spins are often necessary for the best results.
What mix-ins work best with coffee ice cream?
Popular mix-ins include mini chocolate chips, crushed chocolate-covered espresso beans, caramel sauce, and cocoa powder. Add these during the final re-spin cycle to maintain the ice cream’s smooth texture while incorporating delicious flavor enhancements.
How do I make the coffee flavor stronger?
Use concentrated espresso instead of regular coffee, increase the instant espresso powder to 3 tablespoons, or add a splash of coffee liqueur. Make sure your brewed coffee is completely cooled before mixing to prevent affecting the ice cream’s texture.
Can I make multiple batches at once?
Yes, you can prepare several pint containers simultaneously. Mix larger batches of the base recipe, divide into multiple Ninja Creami pint containers, and freeze all at once. This ensures you have a steady supply of homemade coffee ice cream ready to process.